Ship:Mikasa
imported>SirDixie:eu m Removed dead forum link. |
No edit summary |
||
| (3 intermediate revisions by 2 users not shown) | |||
| Line 1: | Line 1: | ||
{{#vardefine:ship_name|Mikasa}} | |||
__NOTOC____NOEDITSECTION__ | |||
<div class="b-description gw-frame-1"><div class="b-description-img b-description-img__indent b-description-img__single"><div style="width:160px; height:102px; opacity:.5; border-radius:2px; position:absolute; left:0; top:0; z-index:1; -webkit-transition:all 0.2s ease-out 0.1s; transition:all 0.2s ease-out 0.1s;">[[File:Wows_anno_flag_japan.png|160px]]</div><div class="l-description-img_class"><span class="b-description-img_type b-description-img_type__Battleship b-description-img_type__Battleship-Premium"></span><span class="b-description-img_class">II</span></div><div class="b-description-img_vehicle">[[File:Ship_PJSB011_Mikasa_1905.png|160px|link=|left]]</div><div class="l-description-img_price"><span class="b-description-img_price b-description-img_price__gold"><span title="''{{#var:ship_name}}'' was first released for sale on DD Month YYYY.">1,500 doubloons</span></span></div></div><p>[[Ship:{{#var:ship_name}}|{{#var:ship_name}}]] — Japan Premium Tier II [[Ship:Battleship|Battleship]].</p><p>Compared to other battleships ordered under the 1896 program, Mikasa had enhanced casemate armor for her secondary armament. The ship was Admiral Togo's flagship during the Russo-Japanese War; she also participated in the Battle of the Yellow Sea and Tsushima. By the beginning of World War I, Mikasa had become obsolete, but she was still listed as part of the fleet—first as a battleship, then as a coastal defense ship. Between 1926 and 1945, the ship served as a museum before being abandoned and partially scrapped. Later, she was restored and installed as a monument on the shore.</p><p> </p></div> | |||
===Pros=== | |||
* Repair Party consumable available | |||
* Powerful secondary armament | |||
===Cons=== | |||
* Low speed | |||
==Ship Stats== | |||
<div class="b-popup"><div class="b-popup_head js-tech-nav_head"><div><h2>Hull Information</h2></div><span class="b-tech-nav_arrow"></span></div><div class="b-popup_content" style="display: none;"><div> | |||
<div style="border: 2px solid rgba(212,175,55,0.8); border-radius: 3px; margin-bottom: 1em; overflow: hidden;"> | |||
{| class="wikitable" style="margin:0; color:inherit; width:100%" | |||
! style="background-color:#1a3244; color:#ffffff; font-weight:bold;" | SURVIVABILITY !! style="background-color:#1a3244; color:#ffffff; font-weight:bold;" | | |||
|- | |||
| style="color:inherit;" | • Hit Points || style="color:inherit;" | 31200 | |||
|- | |||
| style="color:inherit;" | • Torpedo protection damage reduction (%) || style="color:inherit;" | 10 | |||
|} | |||
</div> | |||
| | <div style="border: 2px solid rgba(212,175,55,0.8); border-radius: 3px; margin-bottom: 1em; overflow: hidden;"> | ||
{| class="wikitable" style="margin:0; color:inherit; width:100%" | |||
! style="background-color:#1a3244; color:#ffffff; font-weight:bold;" | ARMOR DETAIL !! style="background-color:#1a3244; color:#ffffff; font-weight:bold;" | | |||
|- | |||
| style="color:inherit;" | • Belt (mm) || style="color:inherit;" | 229 | |||
|- | |||
| style="color:inherit;" | • Deck (mm) || style="color:inherit;" | 32 | |||
|- | |||
| style="color:inherit;" | • Superstructure (mm) || style="color:inherit;" | 10 | |||
|- | |||
| style="color:inherit;" | • Extremities (mm) || style="color:inherit;" | 16 | |||
|} | |||
</div> | |||
| | <div style="border: 2px solid rgba(212,175,55,0.8); border-radius: 3px; margin-bottom: 1em; overflow: hidden;"> | ||
{| class="wikitable" style="margin:0; color:inherit; width:100%" | |||
! style="background-color:#1a3244; color:#ffffff; font-weight:bold;" | MANEUVERABILITY !! style="background-color:#1a3244; color:#ffffff; font-weight:bold;" | | |||
|- | |||
| style="color:inherit;" | • Maximum speed (kt) || style="color:inherit;" | 18.0 | |||
|- | |||
| style="color:inherit;" | • Turning circle radius (m) || style="color:inherit;" | 450 | |||
|- | |||
| style="color:inherit;" | • Rudder-shift time (sec) || style="color:inherit;" | 13.3 | |||
|} | |||
</div> | |||
| | <div style="border: 2px solid rgba(212,175,55,0.8); border-radius: 3px; margin-bottom: 1em; overflow: hidden;"> | ||
{| class="wikitable" style="margin:0; color:inherit; width:100%" | |||
! style="background-color:#1a3244; color:#ffffff; font-weight:bold;" | CONCEALMENT !! style="background-color:#1a3244; color:#ffffff; font-weight:bold;" | | |||
|- | |||
| style="color:inherit;" | • Detectability by sea (km) || style="color:inherit;" | 11.17 | |||
|- | |||
| style="color:inherit;" | • Detectability by air (km) || style="color:inherit;" | 5.64 | |||
|- | |||
| style="color:inherit;" | • Detectability after firing main guns in smoke (km) || style="color:inherit;" | 8.85 | |||
|- | |||
| style="color:inherit;" | • Detectability by depths (km) || style="color:inherit;" | 5.64 | |||
|} | |||
</div> | |||
</div></div></div> | |||
<div class="b-popup"><div class="b-popup_head js-tech-nav_head"><div><h2>Main Battery</h2></div><span class="b-tech-nav_arrow"></span></div><div class="b-popup_content" style="display: none;"><div><div style="border: 2px solid rgba(212,175,55,0.8); border-radius: 3px; margin-bottom: 1em; overflow: hidden;"> | |||
{| class="wikitable" style="margin:0; color:inherit; width:100%" | |||
! style="background-color:#1a3244; color:#ffffff; font-weight:bold;" | MAIN BATTERY !! style="background-color:#1a3244; color:#ffffff; font-weight:bold;" | | |||
|- | |||
| style="color:inherit;" | • Arrangement || style="color:inherit;" | 2×2 305mm | |||
|- | |||
| style="color:inherit;" | • Firing range (km) || style="color:inherit;" | 11.82 | |||
|- | |||
| style="color:inherit;" | • Reload time (sec) || style="color:inherit;" | 30.0 | |||
|- | |||
| style="color:inherit;" | • Rate of fire (shots/min) || style="color:inherit;" | 2 | |||
|- | |||
| style="color:inherit;" | • 180° turn time (sec) || style="color:inherit;" | 30.0 | |||
|} | |||
</div> | |||
<div style="border: 2px solid rgba(212,175,55,0.8); border-radius: 3px; margin-bottom: 1em; overflow: hidden;"> | |||
{| class="wikitable" style="margin:0; color:inherit; width:100%" | |||
! style="background-color:#1a3244; color:#ffffff; font-weight:bold;" | DISPERSION !! style="background-color:#1a3244; color:#ffffff; font-weight:bold;" | | |||
|- | |||
| style="color:inherit;" | • Dispersion type || style="color:inherit;" | — | |||
|- | |||
| style="color:inherit;" | • Dispersion formula || style="color:inherit;" | — | |||
|- | |||
| style="color:inherit;" | • Sigma || style="color:inherit;" | 2.1 | |||
|- | |||
| style="color:inherit;" | • Maximum dispersion (m) || style="color:inherit;" | 160 | |||
|} | |||
</div> | |||
| | <div style="border: 2px solid rgba(212,175,55,0.8); border-radius: 3px; margin-bottom: 1em; overflow: hidden;"> | ||
{| class="wikitable" style="margin:0; color:inherit; width:100%" | |||
! style="background-color:#1a3244; color:#ffffff; font-weight:bold;" | HE SHELL !! style="background-color:#1a3244; color:#ffffff; font-weight:bold;" | | |||
|- | |||
| style="color:inherit;" | • Name || style="color:inherit;" | 305 mm HE 850 lb | |||
|- | |||
| style="color:inherit;" | • Maximum damage || style="color:inherit;" | 4350 | |||
|- | |||
| style="color:inherit;" | • Fire chance (%) || style="color:inherit;" | 29.0% | |||
|- | |||
| style="color:inherit;" | • Shell velocity (m/s) || style="color:inherit;" | 732 | |||
|- | |||
| style="color:inherit;" | • Shell weight (kg) || style="color:inherit;" | 386 | |||
|- | |||
| style="color:inherit;" | • Penetration (mm) || style="color:inherit;" | 51 | |||
|} | |||
</div> | |||
| | <div style="border: 2px solid rgba(212,175,55,0.8); border-radius: 3px; margin-bottom: 1em; overflow: hidden;"> | ||
| | {| class="wikitable" style="margin:0; color:inherit; width:100%" | ||
| | ! style="background-color:#1a3244; color:#ffffff; font-weight:bold;" | AP SHELL !! style="background-color:#1a3244; color:#ffffff; font-weight:bold;" | | ||
| | |- | ||
| style="color:inherit;" | • Name || style="color:inherit;" | 305 mm AP 850 lb | |||
| | |- | ||
| style="color:inherit;" | • Maximum damage || style="color:inherit;" | 6550 | |||
|- | |||
| style="color:inherit;" | • Shell velocity (m/s) || style="color:inherit;" | 732 | |||
|- | |||
| style="color:inherit;" | • Shell weight (kg) || style="color:inherit;" | 386 | |||
|- | |||
| style="color:inherit;" | • Fuse time (sec) || style="color:inherit;" | 0.01 | |||
|- | |||
| style="color:inherit;" | • Ricochet start (°) || style="color:inherit;" | 45 | |||
|- | |||
| style="color:inherit;" | • Always ricochet (°) || style="color:inherit;" | 60 | |||
|- | |||
| style="color:inherit;" | • Normalisation (°) || style="color:inherit;" | 6 | |||
|- | |||
| style="color:inherit;" | • Arming threshold (mm) || style="color:inherit;" | 51 | |||
|} | |||
</div> | |||
</div></div></div> | |||
<div class="b-popup"><div class="b-popup_head js-tech-nav_head"><div><h2>Secondary Battery</h2></div><span class="b-tech-nav_arrow"></span></div><div class="b-popup_content" style="display: none;"><div> | |||
<div style="border: 2px solid rgba(212,175,55,0.8); border-radius: 3px; margin-bottom: 1em; overflow: hidden;"> | |||
{| class="wikitable" style="margin:0; color:inherit; width:100%" | |||
! style="background-color:#1a3244; color:#ffffff; font-weight:bold;" | SECONDARY BATTERY !! style="background-color:#1a3244; color:#ffffff; font-weight:bold;" | | |||
|- | |||
| style="color:inherit;" | • Secondary battery range (km) || style="color:inherit;" | 3.0 | |||
|} | |||
</div> | |||
<div style="border: 2px solid rgba(212,175,55,0.8); border-radius: 3px; margin-bottom: 1em; overflow: hidden;"> | |||
| | {| class="wikitable" style="margin:0; color:inherit; width:100%" | ||
| | ! style="background-color:#1a3244; color:#ffffff; font-weight:bold;" | SECONDARY ARMAMENT 1 !! style="background-color:#1a3244; color:#ffffff; font-weight:bold;" | | ||
| | |- | ||
| | | style="color:inherit;" | • Shell type || style="color:inherit;" | HE | ||
| | |- | ||
| style="color:inherit;" | • Name || style="color:inherit;" | 152 mm HE Type0 | |||
| | |- | ||
| | | style="color:inherit;" | • Arrangement || style="color:inherit;" | 1x76mm | ||
| | |- | ||
| | | style="color:inherit;" | • Rate of fire (shots/min) || style="color:inherit;" | 15.0 | ||
| | |- | ||
| | | style="color:inherit;" | • Maximum damage || style="color:inherit;" | 1300 | ||
} | |- | ||
| style="color:inherit;" | • Shell velocity (m/s) || style="color:inherit;" | 680 | |||
|- | |||
| style="color:inherit;" | • Penetration (mm) || style="color:inherit;" | 13 | |||
|- | |||
| style="color:inherit;" | • Fire chance (%) || style="color:inherit;" | 5.0% | |||
|} | |||
</div> | |||
<div style="border: 2px solid rgba(212,175,55,0.8); border-radius: 3px; margin-bottom: 1em; overflow: hidden;"> | |||
{| class="wikitable" style="margin:0; color:inherit; width:100%" | |||
! style="background-color:#1a3244; color:#ffffff; font-weight:bold;" | SECONDARY ARMAMENT 2 !! style="background-color:#1a3244; color:#ffffff; font-weight:bold;" | | |||
|- | |||
| style="color:inherit;" | • Shell type || style="color:inherit;" | HE | |||
|- | |||
| style="color:inherit;" | • Name || style="color:inherit;" | 76 mm HE Mk2 | |||
|- | |||
| style="color:inherit;" | • Arrangement || style="color:inherit;" | 1x76mm | |||
|- | |||
| style="color:inherit;" | • Rate of fire (shots/min) || style="color:inherit;" | 15.0 | |||
|- | |||
| style="color:inherit;" | • Maximum damage || style="color:inherit;" | 1300 | |||
|- | |||
| style="color:inherit;" | • Shell velocity (m/s) || style="color:inherit;" | 680 | |||
|- | |||
| style="color:inherit;" | • Penetration (mm) || style="color:inherit;" | 13 | |||
|- | |||
| style="color:inherit;" | • Fire chance (%) || style="color:inherit;" | 5.0% | |||
|} | |||
</div> | |||
| | <div style="border: 2px solid rgba(212,175,55,0.8); border-radius: 3px; margin-bottom: 1em; overflow: hidden;"> | ||
{| class="wikitable" style="margin:0; color:inherit; width:100%" | |||
! style="background-color:#1a3244; color:#ffffff; font-weight:bold;" | SECONDARY ARMAMENT 3 !! style="background-color:#1a3244; color:#ffffff; font-weight:bold;" | | |||
|- | |||
| style="color:inherit;" | • Shell type || style="color:inherit;" | HE | |||
|- | |||
| style="color:inherit;" | • Name || style="color:inherit;" | PJGS137_152mm40_Color_Black | |||
|- | |||
| style="color:inherit;" | • Arrangement || style="color:inherit;" | 1x152mm | |||
|- | |||
| style="color:inherit;" | • Rate of fire (shots/min) || style="color:inherit;" | 6.0 | |||
|- | |||
| style="color:inherit;" | • Maximum damage || style="color:inherit;" | 3000 | |||
|- | |||
| style="color:inherit;" | • Shell velocity (m/s) || style="color:inherit;" | 701 | |||
|- | |||
| style="color:inherit;" | • Penetration (mm) || style="color:inherit;" | 25 | |||
|- | |||
| style="color:inherit;" | • Fire chance (%) || style="color:inherit;" | 10.0% | |||
|} | |||
</div> | |||
<div style="border: 2px solid rgba(212,175,55,0.8); border-radius: 3px; margin-bottom: 1em; overflow: hidden;"> | |||
{| class="wikitable" style="margin:0; color:inherit; width:100%" | |||
! style="background-color:#1a3244; color:#ffffff; font-weight:bold;" | SECONDARY ARMAMENT 4 !! style="background-color:#1a3244; color:#ffffff; font-weight:bold;" | | |||
|- | |||
| style="color:inherit;" | • Shell type || style="color:inherit;" | HE | |||
|- | |||
| style="color:inherit;" | • Name || style="color:inherit;" | PJGS133_76mm40_with_shield_White | |||
|- | |||
| style="color:inherit;" | • Arrangement || style="color:inherit;" | 1x76mm | |||
|- | |||
| style="color:inherit;" | • Rate of fire (shots/min) || style="color:inherit;" | 15.0 | |||
|- | |||
| style="color:inherit;" | • Maximum damage || style="color:inherit;" | 1300 | |||
|- | |||
| style="color:inherit;" | • Shell velocity (m/s) || style="color:inherit;" | 680 | |||
|- | |||
| style="color:inherit;" | • Penetration (mm) || style="color:inherit;" | 13 | |||
|- | |||
| style="color:inherit;" | • Fire chance (%) || style="color:inherit;" | 5.0% | |||
|} | |||
</div> | |||
</div></div></div> | |||
<!-- Add the ship code here to populate the upgrade table --> | |||
{{Ship Upgrades Section|code=PJSB011_Mikasa_1905}} | |||
| | |||
<!-- Consumables have to be tagged individually on a slot by slot basis --> | |||
| | {{Ship Consumables Section|consumables= | ||
* '''Slot 1:''' {{Damage Control Party}} (10.0s action, 80.0s cooldown) | |||
* '''Slot 2:''' {{Repair Party}} (4 charges, 28.0s action, 80.0s cooldown, 156 hp/s) | |||
}} | }} | ||
==== | ==Gallery== | ||
<div class="b-popup"><div class="b-popup_head js-tech-nav_head"><div><h2>WoWs Gallery</h2></div><span class="b-tech-nav_arrow"></span></div><div class="b-popup_content" style="display: none;"><div> | |||
: | |||
<gallery> | |||
</gallery>[[File:Mikasa.jpg|left|thumb]]</div></div></div> | |||
: | |||
=== | <div class="b-popup"><div class="b-popup_head js-tech-nav_head"><div><h2>Historical Gallery</h2></div><span class="b-tech-nav_arrow"></span></div><div class="b-popup_content" style="display: none;"><div> | ||
<gallery> | |||
</gallery> | |||
</div></div></div> | |||
</ | |||
[[Category:Ships of Japan]] | |||
[[Category:Battleships]] | |||
[[Category:Tier II ships]] | |||
[[Category:Premium ships]]<!-- DO NOT DELETE THIS LINE. DO NOT INSERT ANYTHING BELOW THIS LINE --> | |||
Latest revision as of 23:16, 5 July 2026

II
1,500 doubloons
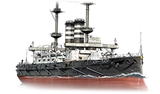
Mikasa — Japan Premium Tier II Battleship.
Compared to other battleships ordered under the 1896 program, Mikasa had enhanced casemate armor for her secondary armament. The ship was Admiral Togo's flagship during the Russo-Japanese War; she also participated in the Battle of the Yellow Sea and Tsushima. By the beginning of World War I, Mikasa had become obsolete, but she was still listed as part of the fleet—first as a battleship, then as a coastal defense ship. Between 1926 and 1945, the ship served as a museum before being abandoned and partially scrapped. Later, she was restored and installed as a monument on the shore.
Pros
- Repair Party consumable available
- Powerful secondary armament
Cons
- Low speed
Ship Stats
Hull Information
Main Battery
Secondary Battery
Compatible Upgrades
| Slot 1 |
 |
 |

|
|---|
Consumables
- Slot 1: Damage Control Party
 (10.0s action, 80.0s cooldown)
 - Slot 2: Repair Party
 (4 charges, 28.0s action, 80.0s cooldown, 156 hp/s)

