Ship:Carnot
Automated stats update via wiki pipeline |
Added change log entries |
||
| (One intermediate revision by the same user not shown) | |||
| Line 5: | Line 5: | ||
===Pros=== | ===Pros=== | ||
* | * Great damage per salvo | ||
* | * High survivability | ||
* Enhanced engine boost available | |||
===Cons=== | ===Cons=== | ||
* | * Low rate of fire | ||
* | * No torpedo armament | ||
| Line 21: | Line 24: | ||
| style="color:inherit;" | • Hit Points || style="color:inherit;" | 66450 | | style="color:inherit;" | • Hit Points || style="color:inherit;" | 66450 | ||
|- | |- | ||
| style="color:inherit;" | • Torpedo protection damage reduction (%) || style="color:inherit;" | | | style="color:inherit;" | • Torpedo protection damage reduction (%) || style="color:inherit;" | 19 | ||
|} | |} | ||
</div> | </div> | ||
| Line 29: | Line 32: | ||
! style="background-color:#1a3244; color:#ffffff; font-weight:bold;" | ARMOR DETAIL !! style="background-color:#1a3244; color:#ffffff; font-weight:bold;" | | ! style="background-color:#1a3244; color:#ffffff; font-weight:bold;" | ARMOR DETAIL !! style="background-color:#1a3244; color:#ffffff; font-weight:bold;" | | ||
|- | |- | ||
| style="color:inherit;" | • Belt (mm) || style="color:inherit;" | | | style="color:inherit;" | • Belt (mm) || style="color:inherit;" | 180 | ||
|- | |- | ||
| style="color:inherit;" | • Deck (mm) || style="color:inherit;" | | | style="color:inherit;" | • Deck (mm) || style="color:inherit;" | 36 | ||
|- | |- | ||
| style="color:inherit;" | • Superstructure (mm) || style="color:inherit;" | | | style="color:inherit;" | • Superstructure (mm) || style="color:inherit;" | 16 | ||
|- | |- | ||
| style="color:inherit;" | • Extremities (mm) || style="color:inherit;" | | | style="color:inherit;" | • Extremities (mm) || style="color:inherit;" | 25 | ||
|} | |} | ||
</div> | </div> | ||
| Line 47: | Line 50: | ||
| style="color:inherit;" | • Turning circle radius (m) || style="color:inherit;" | 870 | | style="color:inherit;" | • Turning circle radius (m) || style="color:inherit;" | 870 | ||
|- | |- | ||
| style="color:inherit;" | • Rudder-shift time (sec) || style="color:inherit;" | | | style="color:inherit;" | • Rudder-shift time (sec) || style="color:inherit;" | 14.4 | ||
|} | |} | ||
</div> | </div> | ||
| Line 70: | Line 73: | ||
! style="background-color:#1a3244; color:#ffffff; font-weight:bold;" | MAIN BATTERY !! style="background-color:#1a3244; color:#ffffff; font-weight:bold;" | | ! style="background-color:#1a3244; color:#ffffff; font-weight:bold;" | MAIN BATTERY !! style="background-color:#1a3244; color:#ffffff; font-weight:bold;" | | ||
|- | |- | ||
| style="color:inherit;" | • Arrangement || style="color:inherit;" | | | style="color:inherit;" | • Arrangement || style="color:inherit;" | 1x4 + 2x3 305mm | ||
|- | |- | ||
| style="color:inherit;" | • Firing range (km) || style="color:inherit;" | 18.56 | | style="color:inherit;" | • Firing range (km) || style="color:inherit;" | 18.56 | ||
| Line 164: | Line 167: | ||
| style="color:inherit;" | • Name || style="color:inherit;" | 139 mm HE OEA Mle 1910 | | style="color:inherit;" | • Name || style="color:inherit;" | 139 mm HE OEA Mle 1910 | ||
|- | |- | ||
| style="color:inherit;" | • Arrangement || style="color:inherit;" | | | style="color:inherit;" | • Arrangement || style="color:inherit;" | 4x2 139mm | ||
|- | |- | ||
| style="color:inherit;" | • Rate of fire (shots/min) || style="color:inherit;" | 6.0 | | style="color:inherit;" | • Rate of fire (shots/min) || style="color:inherit;" | 6.0 | ||
| Line 186: | Line 189: | ||
| style="color:inherit;" | • Name || style="color:inherit;" | 100 mm HE OEA Mle 1945 | | style="color:inherit;" | • Name || style="color:inherit;" | 100 mm HE OEA Mle 1945 | ||
|- | |- | ||
| style="color:inherit;" | • Arrangement || style="color:inherit;" | | | style="color:inherit;" | • Arrangement || style="color:inherit;" | 8x2 100mm | ||
|- | |- | ||
| style="color:inherit;" | • Rate of fire (shots/min) || style="color:inherit;" | 20.0 | | style="color:inherit;" | • Rate of fire (shots/min) || style="color:inherit;" | 20.0 | ||
| Line 274: | Line 277: | ||
<gallery> | <gallery> | ||
File:Carnot_in_Marseille.png | |||
</gallery> | </gallery> | ||
</div></div></div> | </div></div></div> | ||
<div class="b-popup"><div class="b- | <div class="b-popup"><div class="b-popup_head js-tech-nav_head"><div><div class="mw-heading mw-heading2"><h2 id="Ship_Change_Log">Ship Change Log</h2></div></div><span class="b-tech-nav_arrow"></span></div><div class="b-popup_content" style="display: none;"><div> | ||
*Update 0.10.6: | |||
**Available for testing by supertesters in the game starting from Update 0.10.6. | |||
**Preliminary characteristics. | |||
*Update 0.10.7: | |||
*AP shell fuse arming time increased from 0.01 to 0.033 s. | |||
*Update 0.10.8: | |||
**Main battery firing range decreased from 19.0 to 18.1 km. | |||
**Main battery reload time increased from 24 to 25 s. | |||
**Sigma parameter decreased from 2.05 to 1.9. | |||
**Main Battery firing range increased from 18.1 to 18.6 km. | |||
**Sigma parameter increased from 1.9 to 2.05. | |||
**First appeared on sale in September 2021 (during Update 0.10.8) in the Premium store, the Armory (for 228,000 Coal), or 19,300 doubloons. | |||
</div></div></div> | </div></div></div> | ||
Latest revision as of 17:06, 6 August 2026

IX
18,000 doubloons
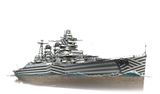
Carnot — France Premium Tier IX Cruiser.
In the process of developing a "large cruiser" in the late 1920s and early 1930s, several cruiser projects with a displacement of 23,690 tons were created. One of these projects was a ship equipped with ten 305 mm guns in three turrets: two triple and one quadruple, with the latter being placed in a superfiring position on the bow and one of the triple-gun turrets on the stern of the ship. The cruiser is also equipped with four 138.6 mm twin-gun mounts and eight 100 mm twin-gun mounts.
Pros
- Great damage per salvo
- High survivability
- Enhanced engine boost available
Cons
- Low rate of fire
- No torpedo armament
Ship Stats
Hull Information
Main Battery
Secondary Battery
Airstrike
AA Defense
Compatible Upgrades
| Slot 1 |
 |
 |
 |

| |
|---|---|---|---|---|---|
| Slot 2 |
 |
 |
 |
 |

|
| Slot 3 |
 |
 |
 |

| |
| Slot 4 |
 |
 |
 |

| |
| Slot 5 |
 |
 |
 |

| |
| Slot 6 |
 |
 |

|
Consumables
- Slot 1: Damage Control Party
 (5.0s action, 60.0s cooldown)
 - Slot 2: Defensive AA Fire
 (3 charges, 40.0s action, 80.0s cooldown) or Hydroacoustic Search
  (3 charges, 100.0s action, 120.0s cooldown)
 - Slot 3: Engine Boost
 (3 charges, 180.0s action, 90.0s cooldown) or Patrol Fighter
  (3 charges, 60.0s action, 90.0s cooldown) or Spotting Aircraft
  (4 charges, 100.0s action, 240.0s cooldown)
 - Slot 4: Repair Party
 (3 charges, 28.0s action, 80.0s cooldown, 332.2 hp/s)

