Ship:Z-23
Automated stats update via wiki pipeline |
Added change log entries |
||
| (2 intermediate revisions by the same user not shown) | |||
| Line 5: | Line 5: | ||
===Pros=== | ===Pros=== | ||
* | * HE shells have high armor penetration capabilities | ||
* | * High AP shell damage | ||
* Hydroacoustic search consumable available | |||
* Torpedoes reload rapidly | |||
===Cons=== | ===Cons=== | ||
* | * Low HE shell damage | ||
* | * Low torpedo damage | ||
| Line 29: | Line 33: | ||
! style="background-color:#1a3244; color:#ffffff; font-weight:bold;" | ARMOR DETAIL !! style="background-color:#1a3244; color:#ffffff; font-weight:bold;" | | ! style="background-color:#1a3244; color:#ffffff; font-weight:bold;" | ARMOR DETAIL !! style="background-color:#1a3244; color:#ffffff; font-weight:bold;" | | ||
|- | |- | ||
| style="color:inherit;" | • Belt (mm) || style="color:inherit;" | | | style="color:inherit;" | • Belt (mm) || style="color:inherit;" | 19 | ||
|- | |- | ||
| style="color:inherit;" | • Deck (mm) || style="color:inherit;" | | | style="color:inherit;" | • Deck (mm) || style="color:inherit;" | 19 | ||
|- | |- | ||
| style="color:inherit;" | • Superstructure (mm) || style="color:inherit;" | | | style="color:inherit;" | • Superstructure (mm) || style="color:inherit;" | 13 | ||
|- | |- | ||
| style="color:inherit;" | • Extremities (mm) || style="color:inherit;" | | | style="color:inherit;" | • Extremities (mm) || style="color:inherit;" | 19 | ||
|} | |} | ||
</div> | </div> | ||
| Line 47: | Line 51: | ||
| style="color:inherit;" | • Turning circle radius (m) || style="color:inherit;" | 680 || style="color:inherit;" | 680 | | style="color:inherit;" | • Turning circle radius (m) || style="color:inherit;" | 680 || style="color:inherit;" | 680 | ||
|- | |- | ||
| style="color:inherit;" | • Rudder-shift time (sec) || style="color:inherit;" | | | style="color:inherit;" | • Rudder-shift time (sec) || style="color:inherit;" | 6.3 || style="color:inherit;" | 4.5 | ||
|} | |} | ||
</div> | </div> | ||
| Line 70: | Line 74: | ||
! style="background-color:#1a3244; color:#ffffff; font-weight:bold;" | MAIN BATTERY !! style="background-color:#1a3244; color:#ffffff; font-weight:bold;" | FKS Typ 8 Mod. 1 !! style="background-color:#1a3244; color:#ffffff; font-weight:bold;" | FKS Typ 8 Mod. 2 | ! style="background-color:#1a3244; color:#ffffff; font-weight:bold;" | MAIN BATTERY !! style="background-color:#1a3244; color:#ffffff; font-weight:bold;" | FKS Typ 8 Mod. 1 !! style="background-color:#1a3244; color:#ffffff; font-weight:bold;" | FKS Typ 8 Mod. 2 | ||
|- | |- | ||
| style="color:inherit;" | • Arrangement || colspan=" | | style="color:inherit;" | • Arrangement || colspan="1" style="color:inherit;" | 4×1 128mm (Hull A) || style="color:inherit;" | 3x1 + 1x2 128mm (Hull B) | ||
|- | |- | ||
| style="color:inherit;" | • Firing range (km) || style="color:inherit;" | 9.85 || style="color:inherit;" | 10.84 | | style="color:inherit;" | • Firing range (km) || style="color:inherit;" | 9.85 || style="color:inherit;" | 10.84 | ||
|- | |- | ||
| style="color:inherit;" | • Reload time (sec) || colspan=" | | style="color:inherit;" | • Reload time (sec) || colspan="3" style="color:inherit;" | 4.0 | ||
|- | |- | ||
| style="color:inherit;" | • Rate of fire (shots/min) || colspan=" | | style="color:inherit;" | • Rate of fire (shots/min) || colspan="3" style="color:inherit;" | 15 | ||
|- | |- | ||
| style="color:inherit;" | • 180° turn time (sec) || colspan=" | | style="color:inherit;" | • 180° turn time (sec) || colspan="3" style="color:inherit;" | 22.5 | ||
|} | |} | ||
</div> | </div> | ||
| Line 146: | Line 150: | ||
<div style="border: 2px solid rgba(212,175,55,0.8); border-radius: 3px; margin-bottom: 1em; overflow: hidden;"> | <div style="border: 2px solid rgba(212,175,55,0.8); border-radius: 3px; margin-bottom: 1em; overflow: hidden;"> | ||
{| class="wikitable" style="margin:0; color:inherit; width:100%" | {| class="wikitable" style="margin:0; color:inherit; width:100%" | ||
! style="background-color:#1a3244; color:#ffffff; font-weight:bold;" | TORPEDO LAUNCHERS !! style="background-color:#1a3244; color:#ffffff; font-weight:bold;" | | ! style="background-color:#1a3244; color:#ffffff; font-weight:bold;" | TORPEDO LAUNCHERS !! style="background-color:#1a3244; color:#ffffff; font-weight:bold;" | G7 Steinbarsch !! style="background-color:#1a3244; color:#ffffff; font-weight:bold;" | G7 Schildbutt | ||
|- | |- | ||
| style="color:inherit;" | • Number of launchers || style="color:inherit;" | | | style="color:inherit;" | • Number of launchers || style="color:inherit;" | 2x4 533mm || style="color:inherit;" | 2x4 533mm | ||
|- | |- | ||
| style="color:inherit;" | • Torpedo name || style="color:inherit;" | | | style="color:inherit;" | • Torpedo name || style="color:inherit;" | G7 Steinbarsch || style="color:inherit;" | G7 Schildbutt | ||
|- | |- | ||
| style="color:inherit;" | • Reload time (sec) || style="color:inherit;" | 90.0 || style="color:inherit;" | 90.0 | | style="color:inherit;" | • Reload time (sec) || style="color:inherit;" | 90.0 || style="color:inherit;" | 90.0 | ||
| Line 156: | Line 160: | ||
| style="color:inherit;" | • 180° turn time (sec) || style="color:inherit;" | 7.2 || style="color:inherit;" | 7.2 | | style="color:inherit;" | • 180° turn time (sec) || style="color:inherit;" | 7.2 || style="color:inherit;" | 7.2 | ||
|- | |- | ||
| style="color:inherit;" | • Damage || style="color:inherit;" | | | style="color:inherit;" | • Damage || style="color:inherit;" | 14400 || style="color:inherit;" | 14400 | ||
|- | |- | ||
| style="color:inherit;" | • Range (km) || style="color:inherit;" | | | style="color:inherit;" | • Range (km) || style="color:inherit;" | 8.5 || style="color:inherit;" | 9.5 | ||
|- | |- | ||
| style="color:inherit;" | • Speed (kt) || style="color:inherit;" | 65 || style="color:inherit;" | 66 | | style="color:inherit;" | • Speed (kt) || style="color:inherit;" | 65 || style="color:inherit;" | 66 | ||
| Line 164: | Line 168: | ||
| style="color:inherit;" | • Detectability (km) || style="color:inherit;" | 1.3 || style="color:inherit;" | 1.4 | | style="color:inherit;" | • Detectability (km) || style="color:inherit;" | 1.3 || style="color:inherit;" | 1.4 | ||
|- | |- | ||
| style="color:inherit;" | • Flooding chance (%) || style="color:inherit;" | | | style="color:inherit;" | • Flooding chance (%) || style="color:inherit;" | 240% || style="color:inherit;" | 240% | ||
|} | |} | ||
</div> | </div> | ||
| Line 194: | Line 198: | ||
{| class="wikitable" style="margin:0 0 0.8em 0; width:100%; color:inherit;" | {| class="wikitable" style="margin:0 0 0.8em 0; width:100%; color:inherit;" | ||
! style="background-color:#1a3244; color:#ffffff; font-weight:bold;" | AA ARMAMENT !! style="background-color:#1a3244; color:#ffffff; font-weight:bold;" | MOUNTS × BARRELS | ! style="background-color:#1a3244; color:#ffffff; font-weight:bold;" | AA ARMAMENT !! style="background-color:#1a3244; color:#ffffff; font-weight:bold;" | MOUNTS × BARRELS | ||
|- | |||
| style="color:inherit;" | 128 mm || style="color:inherit;" | 1 × 2 | |||
|- | |- | ||
| style="color:inherit;" | 37 mm || style="color:inherit;" | 4 × 2 | | style="color:inherit;" | 37 mm || style="color:inherit;" | 4 × 2 | ||
| Line 207: | Line 213: | ||
|- | |- | ||
| style="color:inherit;" | Mid-range || style="color:inherit;" | 94.5 || style="color:inherit;" | 100% || style="color:inherit;" | 3.5 | | style="color:inherit;" | Mid-range || style="color:inherit;" | 94.5 || style="color:inherit;" | 100% || style="color:inherit;" | 3.5 | ||
|- | |||
| style="color:inherit;" | Long-range || style="color:inherit;" | 25 || style="color:inherit;" | 100% || style="color:inherit;" | 5.8 | |||
|} | |||
'''Damage by shell explosions''' | |||
{| class="wikitable" style="margin:0 0 0.8em 0; width:100%; color:inherit;" | |||
! style="background-color:#1a3244; color:#ffffff; font-weight:bold;" | EXPLOSIONS / SALVO !! style="background-color:#1a3244; color:#ffffff; font-weight:bold;" | DAMAGE !! style="background-color:#1a3244; color:#ffffff; font-weight:bold;" | HIT CHANCE !! style="background-color:#1a3244; color:#ffffff; font-weight:bold;" | ACTION ZONE (km) | |||
|- | |||
| style="color:inherit;" | 1 || style="color:inherit;" | 1540 || style="color:inherit;" | 100% || style="color:inherit;" | 3.5–5.8 | |||
|} | |} | ||
</div> | </div> | ||
| Line 219: | Line 233: | ||
| style="color:inherit;" | • Number of charges || style="color:inherit;" | 2 | | style="color:inherit;" | • Number of charges || style="color:inherit;" | 2 | ||
|- | |- | ||
| style="color:inherit;" | • Bombs per charge || style="color:inherit;" | | | style="color:inherit;" | • Bombs per charge || style="color:inherit;" | 12 | ||
|- | |- | ||
| style="color:inherit;" | • Reload time (sec) || style="color:inherit;" | 40.0 | | style="color:inherit;" | • Reload time (sec) || style="color:inherit;" | 40.0 | ||
| Line 244: | Line 258: | ||
<gallery> | <gallery> | ||
File:Z-23(Hull A)_in_Hamburg.png | |||
</gallery> | </gallery> | ||
</div></div></div> | </div></div></div> | ||
| Line 251: | Line 266: | ||
<gallery> | <gallery> | ||
</gallery> | </gallery> | ||
</div></div></div> | |||
<div class="b-popup"><div class="b-popup_head js-tech-nav_head"><div><div class="mw-heading mw-heading2"><h2 id="Ship_Change_Log">Ship Change Log</h2></div></div><span class="b-tech-nav_arrow"></span></div><div class="b-popup_content" style="display: none;"><div> | |||
*Update 0.5.15: | |||
**Available to supertesters in the game starting from Update 0.5.15. | |||
*Update 0.5.16: | |||
**Introduced into the game as a researchable ship in Update 0.5.16. | |||
*Update 0.6.6: | |||
**Improved appearance of the ship using a special technology for high-quality rendering of thin elements (mainly rigging). | |||
*Update 0.6.12: | |||
**Detectability when firing main guns in smoke changed to 3.38 km. | |||
*Update 0.6.13: | |||
**Fire extinguishing time now 30 s instead of 60 s. | |||
*Update 0.6.15: | |||
**Added a bonus to the "Congratulatory" permanent camouflage - a 10% discount to the cost of post-battle maintenance. | |||
*Update 0.7.10: | |||
**Added a special Steel Rat camouflage. | |||
**The range of the Hydroacoustic Search consumable was unified - 5 km for detecting ships, 3.5 km for detecting torpedoes. | |||
*Update 0.8.5: | |||
**Credits earnings increased by +5%. | |||
*Update 0.8.6: | |||
**The HP of the stock hull was increased from 14,700 to 16,700. | |||
*Update 0.8.7: | |||
**Fixed the visual display of the "From the bottom of the Ocean" camouflage. | |||
*Update 0.9.5: | |||
**Armor penetration of 128 mm HE shells was increased from 21 to 32 mm, and penetration of 150 mm HE shells - from 25 to 38 mm. | |||
**Small changes to geometry and textures. | |||
*Update 0.10.3: | |||
**The 150 mm/55 Tbts KC/36T guns on an LDrh LC/38 mount were removed from the game. The main battery models were updated. | |||
**When Hull B is mounted, the artillery configuration will change: the fore turret will become twin-gun. | |||
**Fixed a bug due to which torpedoes inflicted damage if they had already passed the ship or were moving in the opposite direction to it. | |||
*Update 0.10.4: | |||
**Fixed the rotation time of the bow turret. | |||
</div></div></div> | </div></div></div> | ||
Latest revision as of 08:38, 5 August 2026

VIII
8,800,000
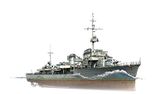
Z-23 — Germany Tech Tree Tier VIII Destroyer.
The Type 1934 ships were followed by an improved Type 1936. The 1936A modification featured an "Atlantic-style" fore stem and 150 mm guns. The lead ship of this type, Z-23, entered service in 1940. The destroyer escorted convoys in the Norwegian waters and later in the Bay of Biscay. In 1941, Z-23 returned to Norway, where she hunted down Arctic convoys and laid minefields. In 1943, she was transferred to France again. During the Battle of the Bay of Biscay, Z-23 was damaged by British bombers and declared a write-off.
Pros
- HE shells have high armor penetration capabilities
- High AP shell damage
- Hydroacoustic search consumable available
- Torpedoes reload rapidly
Cons
- Low HE shell damage
- Low torpedo damage
Ship Stats
Hull Information
Main Battery
Torpedoes
AA Defense
Depth Charges
Compatible Upgrades
| Slot 1 |
 |
 |

| ||
|---|---|---|---|---|---|
| Slot 2 |
 |
 |
 |

| |
| Slot 3 |
 |
 |
 |
 |

|
| Slot 4 |
 |
 |
 |

| |
| Slot 5 |
 |
 |
 |

|
Consumables
- Slot 1: Damage Control Party
 (5.0s action, 40.0s cooldown)
 - Slot 2: Smoke Generator
 (3 charges, 20.0s action, 160.0s cooldown)
 - Slot 3: Engine Boost
 (3 charges, 120.0s action, 120.0s cooldown)
 - Slot 4: Hydroacoustic Search
 (3 charges, 100.0s action, 120.0s cooldown)
Gallery
WoWs Gallery
_in_Hamburg.png)
Historical Gallery
Ship Change Log
Categories:
