Ship:De Ruyter
Automated stats update via wiki pipeline |
Pockington (talk | contribs) m corrected info |
||
| (3 intermediate revisions by one other user not shown) | |||
| Line 5: | Line 5: | ||
===Pros=== | ===Pros=== | ||
* | * Airstrike armament available | ||
* | * Easy to shoot accurately at long ranges | ||
* High AA defense efficiency | |||
===Cons=== | ===Cons=== | ||
* | * Low survivability | ||
* | * Low rate of Fire | ||
| Line 21: | Line 23: | ||
| style="color:inherit;" | • Hit Points || style="color:inherit;" | 21500 || style="color:inherit;" | 24000 | | style="color:inherit;" | • Hit Points || style="color:inherit;" | 21500 || style="color:inherit;" | 24000 | ||
|- | |- | ||
| style="color:inherit;" | • Torpedo protection damage reduction (%) || colspan="2" style="color:inherit;" | | | style="color:inherit;" | • Torpedo protection damage reduction (%) || colspan="2" style="color:inherit;" | 10 | ||
|} | |} | ||
</div> | </div> | ||
| Line 29: | Line 31: | ||
! style="background-color:#1a3244; color:#ffffff; font-weight:bold;" | ARMOR DETAIL !! style="background-color:#1a3244; color:#ffffff; font-weight:bold;" | | ! style="background-color:#1a3244; color:#ffffff; font-weight:bold;" | ARMOR DETAIL !! style="background-color:#1a3244; color:#ffffff; font-weight:bold;" | | ||
|- | |- | ||
| style="color:inherit;" | • Belt (mm) || style="color:inherit;" | | | style="color:inherit;" | • Belt (mm) || style="color:inherit;" | 50 | ||
|- | |- | ||
| style="color:inherit;" | • Deck (mm) || style="color:inherit;" | | | style="color:inherit;" | • Deck (mm) || style="color:inherit;" | 16 | ||
|- | |- | ||
| style="color:inherit;" | • Superstructure (mm) || style="color:inherit;" | | | style="color:inherit;" | • Superstructure (mm) || style="color:inherit;" | 10 | ||
|- | |- | ||
| style="color:inherit;" | • Extremities (mm) || style="color:inherit;" | | | style="color:inherit;" | • Extremities (mm) || style="color:inherit;" | 13 | ||
|} | |} | ||
</div> | </div> | ||
| Line 43: | Line 45: | ||
! style="background-color:#1a3244; color:#ffffff; font-weight:bold;" | MANEUVERABILITY !! style="background-color:#1a3244; color:#ffffff; font-weight:bold;" | De Ruyter (A) !! style="background-color:#1a3244; color:#ffffff; font-weight:bold;" | De Ruyter (B) | ! style="background-color:#1a3244; color:#ffffff; font-weight:bold;" | MANEUVERABILITY !! style="background-color:#1a3244; color:#ffffff; font-weight:bold;" | De Ruyter (A) !! style="background-color:#1a3244; color:#ffffff; font-weight:bold;" | De Ruyter (B) | ||
|- | |- | ||
| style="color:inherit;" | • Maximum speed (kt) || style="color:inherit;" | 32.0 || style="color:inherit;" | | | style="color:inherit;" | • Maximum speed (kt) || style="color:inherit;" | 32.0 || style="color:inherit;" | 33.6 | ||
|- | |- | ||
| style="color:inherit;" | • Turning circle radius (m) || style="color:inherit;" | 660 || style="color:inherit;" | 660 | | style="color:inherit;" | • Turning circle radius (m) || style="color:inherit;" | 660 || style="color:inherit;" | 660 | ||
|- | |- | ||
| style="color:inherit;" | • Rudder-shift time (sec) || style="color:inherit;" | | | style="color:inherit;" | • Rudder-shift time (sec) || style="color:inherit;" | 9.8 || style="color:inherit;" | 7.0 | ||
|} | |} | ||
</div> | </div> | ||
| Line 161: | Line 163: | ||
! style="background-color:#1a3244; color:#ffffff; font-weight:bold;" | RANGE !! style="background-color:#1a3244; color:#ffffff; font-weight:bold;" | DPS !! style="background-color:#1a3244; color:#ffffff; font-weight:bold;" | HIT CHANCE !! style="background-color:#1a3244; color:#ffffff; font-weight:bold;" | ACTION ZONE (km) | ! style="background-color:#1a3244; color:#ffffff; font-weight:bold;" | RANGE !! style="background-color:#1a3244; color:#ffffff; font-weight:bold;" | DPS !! style="background-color:#1a3244; color:#ffffff; font-weight:bold;" | HIT CHANCE !! style="background-color:#1a3244; color:#ffffff; font-weight:bold;" | ACTION ZONE (km) | ||
|- | |- | ||
| style="color:inherit;" | Short-range || style="color:inherit;" | | | style="color:inherit;" | Short-range || style="color:inherit;" | 154 || style="color:inherit;" | 85% || style="color:inherit;" | 2.5 | ||
|} | |} | ||
| Line 178: | Line 180: | ||
! style="background-color:#1a3244; color:#ffffff; font-weight:bold;" | RANGE !! style="background-color:#1a3244; color:#ffffff; font-weight:bold;" | DPS !! style="background-color:#1a3244; color:#ffffff; font-weight:bold;" | HIT CHANCE !! style="background-color:#1a3244; color:#ffffff; font-weight:bold;" | ACTION ZONE (km) | ! style="background-color:#1a3244; color:#ffffff; font-weight:bold;" | RANGE !! style="background-color:#1a3244; color:#ffffff; font-weight:bold;" | DPS !! style="background-color:#1a3244; color:#ffffff; font-weight:bold;" | HIT CHANCE !! style="background-color:#1a3244; color:#ffffff; font-weight:bold;" | ACTION ZONE (km) | ||
|- | |- | ||
| style="color:inherit;" | Short-range || style="color:inherit;" | | | style="color:inherit;" | Short-range || style="color:inherit;" | 70 || style="color:inherit;" | 85% || style="color:inherit;" | 1.5 | ||
|- | |- | ||
| style="color:inherit;" | Mid-range || style="color:inherit;" | | | style="color:inherit;" | Mid-range || style="color:inherit;" | 118 || style="color:inherit;" | 90% || style="color:inherit;" | 3.5 | ||
|} | |} | ||
</div> | </div> | ||
| Line 201: | Line 203: | ||
<div class="b-popup"><div class="b-popup_head js-tech-nav_head"><div><h2>WoWs Gallery</h2></div><span class="b-tech-nav_arrow"></span></div><div class="b-popup_content" style="display: none;"><div> | <div class="b-popup"><div class="b-popup_head js-tech-nav_head"><div><h2>WoWs Gallery</h2></div><span class="b-tech-nav_arrow"></span></div><div class="b-popup_content" style="display: none;"><div> | ||
[[File:ShipDe Ruyter.png|thumb]] | |||
<div class="b-popup"><div class="b-popup_head js-tech-nav_head"><div><h2>Historical Gallery</h2></div><span class="b-tech-nav_arrow"></span></div><div class="b-popup_content" style="display: none;"><div> | <div class="b-popup"><div class="b-popup_head js-tech-nav_head"><div><h2>Historical Gallery</h2></div><span class="b-tech-nav_arrow"></span></div><div class="b-popup_content" style="display: none;"><div> | ||
Latest revision as of 15:42, 10 July 2026

IV
700,000
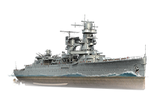
De Ruyter — Netherlands Tech Tree Tier IV Cruiser.
Based on the results of the work of a special commission, the development of a new cruiser began in the Netherlands in 1930. It was planned for the ship to join the fleet in the East Indies in addition to two already available ones. The project was developed by a German-Dutch company and had design features of German ships of that time. The cruiser was named after M. A. de Ruyter, one of the most esteemed Dutch Admirals. The ship was launched in October 1936 and sent to the East Indies the next year, where she stayed until the outbreak of World War II. In 1942, De Ruyter was the flagship of the allied squadron commanded by Admiral Karel Doorman.
Pros
- Airstrike armament available
- Easy to shoot accurately at long ranges
- High AA defense efficiency
Cons
- Low survivability
- Low rate of Fire
Ship Stats
Hull Information
Main Battery
AA Defense
Compatible Upgrades
| Slot 1 |
 |
 |
 |

|
|---|---|---|---|---|
| Slot 2 |
 |
 |

|
Consumables
- Slot 1: Damage Control Party
 (5.0s action, 60.0s cooldown)
 - Slot 2: Hydroacoustic Search
 (3 charges, 100.0s action, 120.0s cooldown)
 - Slot 3: Spotting Aircraft
 (4 charges, 100.0s action, 240.0s cooldown) or Patrol Fighter
  (3 charges, 60.0s action, 90.0s cooldown)
Gallery
WoWs Gallery

Categories:
