Ship:Yamagiri
Automated stats update via wiki pipeline |
Pockington (talk | contribs) added missing information on launch day |
||
| (2 intermediate revisions by one other user not shown) | |||
| Line 5: | Line 5: | ||
===Pros=== | ===Pros=== | ||
* | * Burst Fire alternative fire mode | ||
* | * Two torpedo types available to choose from in battle | ||
* Great damage and long-range torpedoes | |||
===Cons=== | ===Cons=== | ||
* | * Low AA defense efficiency | ||
* | * Small HP pool | ||
| Line 21: | Line 22: | ||
| style="color:inherit;" | • Hit Points || style="color:inherit;" | 22200 | | style="color:inherit;" | • Hit Points || style="color:inherit;" | 22200 | ||
|- | |- | ||
| style="color:inherit;" | • Torpedo protection damage reduction (%) || style="color:inherit;" | | | style="color:inherit;" | • Torpedo protection damage reduction (%) || style="color:inherit;" | 0 | ||
|} | |} | ||
</div> | </div> | ||
| Line 29: | Line 30: | ||
! style="background-color:#1a3244; color:#ffffff; font-weight:bold;" | ARMOR DETAIL !! style="background-color:#1a3244; color:#ffffff; font-weight:bold;" | | ! style="background-color:#1a3244; color:#ffffff; font-weight:bold;" | ARMOR DETAIL !! style="background-color:#1a3244; color:#ffffff; font-weight:bold;" | | ||
|- | |- | ||
| style="color:inherit;" | • Belt (mm) || style="color:inherit;" | | | style="color:inherit;" | • Belt (mm) || style="color:inherit;" | 19 | ||
|- | |- | ||
| style="color:inherit;" | • Deck (mm) || style="color:inherit;" | | | style="color:inherit;" | • Deck (mm) || style="color:inherit;" | 19 | ||
|- | |- | ||
| style="color:inherit;" | • Superstructure (mm) || style="color:inherit;" | | | style="color:inherit;" | • Superstructure (mm) || style="color:inherit;" | 13 | ||
|- | |- | ||
| style="color:inherit;" | • Extremities (mm) || style="color:inherit;" | | | style="color:inherit;" | • Extremities (mm) || style="color:inherit;" | 19 | ||
|} | |} | ||
</div> | </div> | ||
| Line 47: | Line 48: | ||
| style="color:inherit;" | • Turning circle radius (m) || style="color:inherit;" | 800 | | style="color:inherit;" | • Turning circle radius (m) || style="color:inherit;" | 800 | ||
|- | |- | ||
| style="color:inherit;" | • Rudder-shift time (sec) || style="color:inherit;" | 6 | | style="color:inherit;" | • Rudder-shift time (sec) || style="color:inherit;" | 4.6 | ||
|} | |} | ||
</div> | </div> | ||
| Line 79: | Line 80: | ||
|- | |- | ||
| style="color:inherit;" | • 180° turn time (sec) || style="color:inherit;" | 10.0 | | style="color:inherit;" | • 180° turn time (sec) || style="color:inherit;" | 10.0 | ||
|- | |||
| style="color:inherit;" | • Alternate fire mode || style="color:inherit;" | — | |||
|- | |||
| style="color:inherit;" | • Salvos per burst || style="color:inherit;" | 3 | |||
|- | |||
| style="color:inherit;" | • Interval between salvos (sec) || style="color:inherit;" | 1 | |||
|- | |||
| style="color:inherit;" | • Reload after burst (sec) || style="color:inherit;" | 30 | |||
|} | |} | ||
</div> | </div> | ||
| Line 148: | Line 157: | ||
<div style="border: 2px solid rgba(212,175,55,0.8); border-radius: 3px; margin-bottom: 1em; overflow: hidden;"> | <div style="border: 2px solid rgba(212,175,55,0.8); border-radius: 3px; margin-bottom: 1em; overflow: hidden;"> | ||
{| class="wikitable" style="margin:0; color:inherit; width:100%" | {| class="wikitable" style="margin:0; color:inherit; width:100%" | ||
! style="background-color:#1a3244; color:#ffffff; font-weight:bold;" | TORPEDO LAUNCHERS !! style="background-color:#1a3244; color:#ffffff; font-weight:bold;" | | ! style="background-color:#1a3244; color:#ffffff; font-weight:bold;" | TORPEDO LAUNCHERS !! style="background-color:#1a3244; color:#ffffff; font-weight:bold;" | Type 93 mod. 3 !! style="background-color:#1a3244; color:#ffffff; font-weight:bold;" | Type 93 Improved !! style="background-color:#1a3244; color:#ffffff; font-weight:bold;" | Type F3 (verify) !! style="background-color:#1a3244; color:#ffffff; font-weight:bold;" | Type 93 | ||
|- | |- | ||
| style="color:inherit;" | • | | style="color:inherit;" | • Torpedo tubes (launchers × tubes) || style="color:inherit;" | 3 × 6 || style="color:inherit;" | 3 × 6 || style="color:inherit;" | 3 × 6 || style="color:inherit;" | 3 × 6 | ||
|- | |- | ||
| style="color:inherit;" | • Torpedo name || style="color:inherit;" | | | style="color:inherit;" | • Torpedo name || style="color:inherit;" | Type 93 mod. 3 || style="color:inherit;" | Type 93 Improved|| style="color:inherit;" | Type F3 || style="color:inherit;" | Type 93 | ||
|- | |- | ||
| style="color:inherit;" | • Reload time (sec) || style="color:inherit;" | 155 | | style="color:inherit;" | • Reload time (sec) || style="color:inherit;" | 155 || style="color:inherit;" | 155 || style="color:inherit;" | 131 || style="color:inherit;" | 131 | ||
|- | |- | ||
| style="color:inherit;" | • 180° turn time (sec) || style="color:inherit;" | 7.2 || style="color:inherit;" | 7.2 || style="color:inherit;" | 7.2 || style="color:inherit;" | 7.2 | | style="color:inherit;" | • 180° turn time (sec) || style="color:inherit;" | 7.2 || style="color:inherit;" | 7.2 || style="color:inherit;" | 7.2 || style="color:inherit;" | 7.2 | ||
|- | |- | ||
| style="color:inherit;" | • Damage || style="color:inherit;" | | | style="color:inherit;" | • Damage || style="color:inherit;" | 23,767 || style="color:inherit;" | 23,767 || style="color:inherit;" | 21,367 || style="color:inherit;" | 20,967 | ||
|- | |- | ||
| style="color:inherit;" | • Range (km) || style="color:inherit;" | 0 | | style="color:inherit;" | • Range (km) || style="color:inherit;" | 12.0 || style="color:inherit;" | 20.0 || style="color:inherit;" | 8.0 || style="color:inherit;" | 20.0 | ||
|- | |- | ||
| style="color:inherit;" | • Speed (kt) || style="color:inherit;" | 67 || style="color:inherit;" | 64 || style="color:inherit;" | 76 || style="color:inherit;" | 62 | | style="color:inherit;" | • Speed (kt) || style="color:inherit;" | 67 || style="color:inherit;" | 64 || style="color:inherit;" | 76 || style="color:inherit;" | 62 | ||
| Line 166: | Line 175: | ||
| style="color:inherit;" | • Detectability (km) || style="color:inherit;" | 1.7 || style="color:inherit;" | 2.5 || style="color:inherit;" | 1.8 || style="color:inherit;" | 2.5 | | style="color:inherit;" | • Detectability (km) || style="color:inherit;" | 1.7 || style="color:inherit;" | 2.5 || style="color:inherit;" | 1.8 || style="color:inherit;" | 2.5 | ||
|- | |- | ||
| style="color:inherit;" | • Flooding chance (%) || style="color:inherit;" | | | style="color:inherit;" | • Flooding chance (%) || style="color:inherit;" | 406 || style="color:inherit;" | 406 || style="color:inherit;" | 361 || style="color:inherit;" | 355 | ||
|} | |} | ||
</div> | </div> | ||
| Line 175: | Line 184: | ||
{| class="wikitable" style="margin:0 0 0.8em 0; width:100%; color:inherit;" | {| class="wikitable" style="margin:0 0 0.8em 0; width:100%; color:inherit;" | ||
! style="background-color:#1a3244; color:#ffffff; font-weight:bold;" | AA ARMAMENT !! style="background-color:#1a3244; color:#ffffff; font-weight:bold;" | MOUNTS × BARRELS | ! style="background-color:#1a3244; color:#ffffff; font-weight:bold;" | AA ARMAMENT !! style="background-color:#1a3244; color:#ffffff; font-weight:bold;" | MOUNTS × BARRELS | ||
|- | |||
| style="color:inherit;" | 127 mm || style="color:inherit;" | 3 × 2 | |||
|- | |- | ||
| style="color:inherit;" | 40 mm || style="color:inherit;" | 5 × 2 | | style="color:inherit;" | 40 mm || style="color:inherit;" | 5 × 2 | ||
| Line 188: | Line 199: | ||
|- | |- | ||
| style="color:inherit;" | Mid-range || style="color:inherit;" | 112 || style="color:inherit;" | 100% || style="color:inherit;" | 3.5 | | style="color:inherit;" | Mid-range || style="color:inherit;" | 112 || style="color:inherit;" | 100% || style="color:inherit;" | 3.5 | ||
|- | |||
| style="color:inherit;" | Long-range || style="color:inherit;" | 63 || style="color:inherit;" | 100% || style="color:inherit;" | 5.8 | |||
|} | |||
'''Damage by shell explosions''' | |||
{| class="wikitable" style="margin:0 0 0.8em 0; width:100%; color:inherit;" | |||
! style="background-color:#1a3244; color:#ffffff; font-weight:bold;" | EXPLOSIONS / SALVO !! style="background-color:#1a3244; color:#ffffff; font-weight:bold;" | DAMAGE !! style="background-color:#1a3244; color:#ffffff; font-weight:bold;" | HIT CHANCE !! style="background-color:#1a3244; color:#ffffff; font-weight:bold;" | ACTION ZONE (km) | |||
|- | |||
| style="color:inherit;" | 3 || style="color:inherit;" | 1610 || style="color:inherit;" | 100% || style="color:inherit;" | 3.5–5.8 | |||
|} | |} | ||
</div> | </div> | ||
| Line 200: | Line 220: | ||
| style="color:inherit;" | • Number of charges || style="color:inherit;" | 2 | | style="color:inherit;" | • Number of charges || style="color:inherit;" | 2 | ||
|- | |- | ||
| style="color:inherit;" | • Bombs per charge || style="color:inherit;" | | | style="color:inherit;" | • Bombs per charge || style="color:inherit;" | 20 | ||
|- | |- | ||
| style="color:inherit;" | • Reload time (sec) || style="color:inherit;" | 40.0 | | style="color:inherit;" | • Reload time (sec) || style="color:inherit;" | 40.0 | ||
| Line 224: | Line 244: | ||
<gallery> | <gallery> | ||
</gallery> | </gallery>[[File:Yamagiri.jpg|left|thumb]]</div></div></div> | ||
</div></div></div> | |||
<div class="b-popup"><div class="b-popup_head js-tech-nav_head"><div><h2>Historical Gallery</h2></div><span class="b-tech-nav_arrow"></span></div><div class="b-popup_content" style="display: none;"><div> | <div class="b-popup"><div class="b-popup_head js-tech-nav_head"><div><h2>Historical Gallery</h2></div><span class="b-tech-nav_arrow"></span></div><div class="b-popup_content" style="display: none;"><div> | ||
Latest revision as of 17:02, 9 July 2026

11
45,000,000
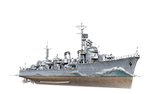
Yamagiri — Japan Tech Tree Tier 11 Destroyer.
The initial project of the Shimakaze-class destroyers involved the use of sextuple- or septuple-tube torpedo launchers to create a total side salvo of 18 to 21 torpedoes. However, due to the excessive total weight of the torpedo launchers and quick-reload systems, the project had to be abandoned.
Pros
- Burst Fire alternative fire mode
- Two torpedo types available to choose from in battle
- Great damage and long-range torpedoes
Cons
- Low AA defense efficiency
- Small HP pool
Ship Stats
Hull Information
Main Battery
Torpedoes
AA Defense
Depth Charges
Compatible Upgrades
| Slot 1 |
 |
 |

| ||
|---|---|---|---|---|---|
| Slot 2 |
 |
 |

| ||
| Slot 3 |
 |
 |
 |
 |

|
| Slot 4 |
 |
 |
 |

| |
| Slot 5 |
 |
 |
 |

| |
| Slot 6 |
 |
 |
 |

|
Consumables
- Slot 1: Damage Control Party
 (5.0s action, 40.0s cooldown)
 - Slot 2: Smoke Generator
 (3 charges, 20.0s action, 160.0s cooldown)
 - Slot 3: Engine Boost
 (3 charges, 120.0s action, 120.0s cooldown)
Gallery
WoWs Gallery

Historical Gallery
Categories:
