Ship:Sejong
Pockington (talk | contribs) No edit summary |
Pockington (talk | contribs) fixed rudder shift, torpedo stats, missing DP AA mounts, missing long range stats, missing flak info, and ASW charges |
||
| (One intermediate revision by the same user not shown) | |||
| Line 49: | Line 49: | ||
| style="color:inherit;" | • Turning circle radius (m) || style="color:inherit;" | 670 || style="color:inherit;" | 670 | | style="color:inherit;" | • Turning circle radius (m) || style="color:inherit;" | 670 || style="color:inherit;" | 670 | ||
|- | |- | ||
| style="color:inherit;" | • Rudder-shift time (sec) || style="color:inherit;" | | | style="color:inherit;" | • Rudder-shift time (sec) || style="color:inherit;" | 10.8 || style="color:inherit;" | 7.7 | ||
|} | |} | ||
</div> | </div> | ||
| Line 152: | Line 152: | ||
! style="background-color:#1a3244; color:#ffffff; font-weight:bold;" | TORPEDO LAUNCHERS !! style="background-color:#1a3244; color:#ffffff; font-weight:bold;" | | ! style="background-color:#1a3244; color:#ffffff; font-weight:bold;" | TORPEDO LAUNCHERS !! style="background-color:#1a3244; color:#ffffff; font-weight:bold;" | | ||
|- | |- | ||
| style="color:inherit;" | • Number of launchers || style="color:inherit;" | | | style="color:inherit;" | • Number of launchers || style="color:inherit;" | 4x4 | ||
|- | |- | ||
| style="color:inherit;" | • Torpedo name || style="color:inherit;" | | | style="color:inherit;" | • Torpedo name || style="color:inherit;" | Mk16 mod. 2 | ||
|- | |- | ||
| style="color:inherit;" | • Reload time (sec) || style="color:inherit;" | 125.0 | | style="color:inherit;" | • Reload time (sec) || style="color:inherit;" | 125.0 | ||
| Line 160: | Line 160: | ||
| style="color:inherit;" | • 180° turn time (sec) || style="color:inherit;" | 7.2 | | style="color:inherit;" | • 180° turn time (sec) || style="color:inherit;" | 7.2 | ||
|- | |- | ||
| style="color:inherit;" | • Damage || style="color:inherit;" | | | style="color:inherit;" | • Damage || style="color:inherit;" | 17900 | ||
|- | |- | ||
| style="color:inherit;" | • Range (km) || style="color:inherit;" | | | style="color:inherit;" | • Range (km) || style="color:inherit;" | 12 | ||
|- | |- | ||
| style="color:inherit;" | • Speed (kt) || style="color:inherit;" | 67 | | style="color:inherit;" | • Speed (kt) || style="color:inherit;" | 67 | ||
| Line 168: | Line 168: | ||
| style="color:inherit;" | • Detectability (km) || style="color:inherit;" | 0.8 | | style="color:inherit;" | • Detectability (km) || style="color:inherit;" | 0.8 | ||
|- | |- | ||
| style="color:inherit;" | • Flooding chance (%) || style="color:inherit;" | | | style="color:inherit;" | • Flooding chance (%) || style="color:inherit;" | 368% | ||
|} | |} | ||
</div> | </div> | ||
| Line 179: | Line 179: | ||
{| class="wikitable" style="margin:0 0 0.8em 0; width:100%; color:inherit;" | {| class="wikitable" style="margin:0 0 0.8em 0; width:100%; color:inherit;" | ||
! style="background-color:#1a3244; color:#ffffff; font-weight:bold;" | AA ARMAMENT !! style="background-color:#1a3244; color:#ffffff; font-weight:bold;" | MOUNTS × BARRELS | ! style="background-color:#1a3244; color:#ffffff; font-weight:bold;" | AA ARMAMENT !! style="background-color:#1a3244; color:#ffffff; font-weight:bold;" | MOUNTS × BARRELS | ||
|- | |||
| style="color:inherit;" | 127 mm || style="color:inherit;" | 6 × 2 | |||
|- | |- | ||
| style="color:inherit;" | 40 mm || style="color:inherit;" | 8 × 4 | | style="color:inherit;" | 40 mm || style="color:inherit;" | 8 × 4 | ||
| Line 192: | Line 194: | ||
|- | |- | ||
| style="color:inherit;" | Mid-range || style="color:inherit;" | 210 || style="color:inherit;" | 90% || style="color:inherit;" | 3.5 | | style="color:inherit;" | Mid-range || style="color:inherit;" | 210 || style="color:inherit;" | 90% || style="color:inherit;" | 3.5 | ||
|- | |||
| style="color:inherit;" | Long-range || style="color:inherit;" | 175 || style="color:inherit;" | 90% || style="color:inherit;" | 6.0 | |||
|} | |||
'''Damage by shell explosions''' | |||
{| class="wikitable" style="margin:0 0 0.8em 0; width:100%; color:inherit;" | |||
! style="background-color:#1a3244; color:#ffffff; font-weight:bold;" | EXPLOSIONS / SALVO !! style="background-color:#1a3244; color:#ffffff; font-weight:bold;" | DAMAGE !! style="background-color:#1a3244; color:#ffffff; font-weight:bold;" | HIT CHANCE !! style="background-color:#1a3244; color:#ffffff; font-weight:bold;" | ACTION ZONE (km) | |||
|- | |||
| style="color:inherit;" | 10 || style="color:inherit;" | 1750 || style="color:inherit;" | 90% || style="color:inherit;" | 3.5–6.0 | |||
|} | |} | ||
| Line 198: | Line 209: | ||
{| class="wikitable" style="margin:0 0 0.8em 0; width:100%; color:inherit;" | {| class="wikitable" style="margin:0 0 0.8em 0; width:100%; color:inherit;" | ||
! style="background-color:#1a3244; color:#ffffff; font-weight:bold;" | AA ARMAMENT !! style="background-color:#1a3244; color:#ffffff; font-weight:bold;" | MOUNTS × BARRELS | ! style="background-color:#1a3244; color:#ffffff; font-weight:bold;" | AA ARMAMENT !! style="background-color:#1a3244; color:#ffffff; font-weight:bold;" | MOUNTS × BARRELS | ||
|- | |||
| style="color:inherit;" | 127 mm || style="color:inherit;" | 6 × 2 | |||
|- | |- | ||
| style="color:inherit;" | 76 mm || style="color:inherit;" | 8 × 2 | | style="color:inherit;" | 76 mm || style="color:inherit;" | 8 × 2 | ||
| Line 211: | Line 224: | ||
|- | |- | ||
| style="color:inherit;" | Mid-range || style="color:inherit;" | 269.5 || style="color:inherit;" | 90% || style="color:inherit;" | 4.0 | | style="color:inherit;" | Mid-range || style="color:inherit;" | 269.5 || style="color:inherit;" | 90% || style="color:inherit;" | 4.0 | ||
|- | |||
| style="color:inherit;" | Long-range || style="color:inherit;" | 175 || style="color:inherit;" | 90% || style="color:inherit;" | 6.0 | |||
|} | |||
'''Damage by shell explosions''' | |||
{| class="wikitable" style="margin:0 0 0.8em 0; width:100%; color:inherit;" | |||
! style="background-color:#1a3244; color:#ffffff; font-weight:bold;" | EXPLOSIONS / SALVO !! style="background-color:#1a3244; color:#ffffff; font-weight:bold;" | DAMAGE !! style="background-color:#1a3244; color:#ffffff; font-weight:bold;" | HIT CHANCE !! style="background-color:#1a3244; color:#ffffff; font-weight:bold;" | ACTION ZONE (km) | |||
|- | |||
| style="color:inherit;" | 10 || style="color:inherit;" | 1750 || style="color:inherit;" | 90% || style="color:inherit;" | 3.5–6.0 | |||
|} | |} | ||
</div> | </div> | ||
</div></div></div> | </div></div></div> | ||
| Line 223: | Line 246: | ||
| style="color:inherit;" | • Number of charges || style="color:inherit;" | 2 | | style="color:inherit;" | • Number of charges || style="color:inherit;" | 2 | ||
|- | |- | ||
| style="color:inherit;" | • Bombs per charge || style="color:inherit;" | | | style="color:inherit;" | • Bombs per charge || style="color:inherit;" | 12 | ||
|- | |- | ||
| style="color:inherit;" | • Reload time (sec) || style="color:inherit;" | 40.0 | | style="color:inherit;" | • Reload time (sec) || style="color:inherit;" | 40.0 | ||
Latest revision as of 20:57, 3 July 2026

IX
13,000,000
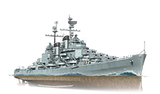
Sejong — Pan-Asia Tech Tree Tier IX Cruiser.
CL-154 class cruisers were designed in the U.S. as a development of the Atlanta-class cruisers. They featured a larger hull and 5-inch guns. The new gun had a higher rate of fire, longer firing range, and heavier shells. Six ships even received their hull numbers, but construction was canceled due to cuts in the naval budget in 1945. Had they been completed, some of the cruisers might have been transferred to the Republic of Korea Navy, which in the 1950s and 60s acquired 42 warships of various types from the United States.
Pros
- Great damage and long range Deepwater torpedoes.
- Smoke screen generator available
- Good rate of fire for the tier.
Cons
- Weak armor plating.
- Low main battery range.
- HE shells do low damage and have low armor penetration.
Ship Stats
Hull Information
Main Battery
Torpedoes
AA Defense
Depth Charges
Compatible Upgrades
| Slot 1 |
 |
 |

| ||
|---|---|---|---|---|---|
| Slot 2 |
 |
 |

| ||
| Slot 3 |
 |
 |
 |
 |

|
| Slot 4 |
 |
 |
 |

| |
| Slot 5 |
 |
 |
 |

| |
| Slot 6 |
 |
 |
 |

|
Consumables
- Slot 1: Damage Control Party
 (5.0s action, 60.0s cooldown)
 - Slot 2: Smoke Generator
 (3 charges, 30.0s action, 110.0s cooldown)
 - Slot 3: Defensive AA Fire
 (3 charges, 40.0s action, 80.0s cooldown)
 - Slot 4: Repair Party
 (3 charges, 28.0s action, 80.0s cooldown, 144 hp/s)
 - Slot 5: Torpedo Reload Booster
 (2 charges, 1.0s action, 300.0s cooldown)
Gallery
WoWs Gallery

Categories:
