Ship:Erich Loewenhardt
Automated stats update via wiki pipeline |
WarshipFoxy (talk | contribs) No edit summary |
||
| Line 5: | Line 5: | ||
===Pros=== | ===Pros=== | ||
* | * High speed | ||
* | * High penetration of HE bombs | ||
* High damage of HE bombs | |||
* AP rockets | |||
===Cons=== | ===Cons=== | ||
* | * Weak armor | ||
* | * Low speed | ||
| Line 21: | Line 24: | ||
| style="color:inherit;" | • Hit Points || style="color:inherit;" | 44300 | | style="color:inherit;" | • Hit Points || style="color:inherit;" | 44300 | ||
|- | |- | ||
| style="color:inherit;" | • Torpedo protection damage reduction (%) || style="color:inherit;" | | | style="color:inherit;" | • Torpedo protection damage reduction (%) || style="color:inherit;" | 16 | ||
|} | |} | ||
</div> | </div> | ||
| Line 29: | Line 32: | ||
! style="background-color:#1a3244; color:#ffffff; font-weight:bold;" | ARMOR DETAIL !! style="background-color:#1a3244; color:#ffffff; font-weight:bold;" | | ! style="background-color:#1a3244; color:#ffffff; font-weight:bold;" | ARMOR DETAIL !! style="background-color:#1a3244; color:#ffffff; font-weight:bold;" | | ||
|- | |- | ||
| style="color:inherit;" | • Belt (mm) || style="color:inherit;" | | | style="color:inherit;" | • Belt (mm) || style="color:inherit;" | 100 | ||
|- | |- | ||
| style="color:inherit;" | • Deck (mm) || style="color:inherit;" | | | style="color:inherit;" | • Deck (mm) || style="color:inherit;" | 21 | ||
|- | |- | ||
| style="color:inherit;" | • Superstructure (mm) || style="color:inherit;" | | | style="color:inherit;" | • Superstructure (mm) || style="color:inherit;" | 10 | ||
|- | |- | ||
| style="color:inherit;" | • Extremities (mm) || style="color:inherit;" | | | style="color:inherit;" | • Extremities (mm) || style="color:inherit;" | 19 | ||
|} | |} | ||
</div> | </div> | ||
| Line 83: | Line 86: | ||
| style="color:inherit;" | • Name || colspan="2" style="color:inherit;" | 150 mm Spr.Gr. L/4.5 | | style="color:inherit;" | • Name || colspan="2" style="color:inherit;" | 150 mm Spr.Gr. L/4.5 | ||
|- | |- | ||
| style="color:inherit;" | • Arrangement || colspan="2" style="color:inherit;" | | | style="color:inherit;" | • Arrangement || colspan="2" style="color:inherit;" | 8x2 150mm | ||
|- | |- | ||
| style="color:inherit;" | • Rate of fire (shots/min) || style="color:inherit;" | 8.0 || style="color:inherit;" | 6.0 | | style="color:inherit;" | • Rate of fire (shots/min) || style="color:inherit;" | 8.0 || style="color:inherit;" | 6.0 | ||
| Line 105: | Line 108: | ||
| style="color:inherit;" | • Name || colspan="2" style="color:inherit;" | 105 mm Spr.Gr. Kz. L/3.84 | | style="color:inherit;" | • Name || colspan="2" style="color:inherit;" | 105 mm Spr.Gr. Kz. L/3.84 | ||
|- | |- | ||
| style="color:inherit;" | • Arrangement || colspan="2" style="color:inherit;" | | | style="color:inherit;" | • Arrangement || colspan="2" style="color:inherit;" | 5x2 105mm | ||
|- | |- | ||
| style="color:inherit;" | • Rate of fire (shots/min) || style="color:inherit;" | 17.9 || style="color:inherit;" | 13.5 | | style="color:inherit;" | • Rate of fire (shots/min) || style="color:inherit;" | 17.9 || style="color:inherit;" | 13.5 | ||
| Line 189: | Line 192: | ||
| style="color:inherit;" | • Plane regeneration time (sec) || style="color:inherit;" | 72.0 | | style="color:inherit;" | • Plane regeneration time (sec) || style="color:inherit;" | 72.0 | ||
|- | |- | ||
| style="color:inherit;" | • Ammo name || style="color:inherit;" | | | style="color:inherit;" | • Ammo name || style="color:inherit;" | Panzerbrechend L/4.8 | ||
|- | |- | ||
| style="color:inherit;" | • Ammo type || style="color:inherit;" | | | style="color:inherit;" | • Ammo type || style="color:inherit;" | Armor-Piercing (AP) Rocket | ||
|- | |- | ||
| style="color:inherit;" | • Rockets in payload || style="color:inherit;" | 4 | | style="color:inherit;" | • Rockets in payload || style="color:inherit;" | 4 | ||
| Line 215: | Line 218: | ||
| style="color:inherit;" | • Aircraft on deck || style="color:inherit;" | 9 | | style="color:inherit;" | • Aircraft on deck || style="color:inherit;" | 9 | ||
|- | |- | ||
| style="color:inherit;" | • Preparation time (sec) || style="color:inherit;" | | | style="color:inherit;" | • Preparation time (sec) || style="color:inherit;" | 89.0 | ||
|- | |- | ||
| style="color:inherit;" | • Detectability (km) || style="color:inherit;" | 10.0 | | style="color:inherit;" | • Detectability (km) || style="color:inherit;" | 10.0 | ||
|- | |- | ||
| style="color:inherit;" | • Torpedo name || style="color:inherit;" | | | style="color:inherit;" | • Torpedo name || style="color:inherit;" | LT F5a | ||
|- | |- | ||
| style="color:inherit;" | • Torpedoes in payload || style="color:inherit;" | 1 | | style="color:inherit;" | • Torpedoes in payload || style="color:inherit;" | 1 | ||
|- | |- | ||
| style="color:inherit;" | • Torpedo damage || style="color:inherit;" | | | style="color:inherit;" | • Torpedo damage || style="color:inherit;" | 4200 | ||
|- | |- | ||
| style="color:inherit;" | • Flood chance (%) || style="color:inherit;" | | | style="color:inherit;" | • Flood chance (%) || style="color:inherit;" | 20% | ||
|- | |- | ||
| style="color:inherit;" | • Torpedo speed (kt) || style="color:inherit;" | 32 | | style="color:inherit;" | • Torpedo speed (kt) || style="color:inherit;" | 32 | ||
|- | |- | ||
| style="color:inherit;" | • Arming distance (m) || style="color:inherit;" | | | style="color:inherit;" | • Arming distance (m) || style="color:inherit;" | 387 | ||
|- | |- | ||
| style="color:inherit;" | • Torpedo range (km) || style="color:inherit;" | 0 | | style="color:inherit;" | • Torpedo range (km) || style="color:inherit;" | 06.0 | ||
|- | |- | ||
| style="color:inherit;" | • Squadrons || style="color:inherit;" | 1 | | style="color:inherit;" | • Squadrons || style="color:inherit;" | 1 | ||
| Line 255: | Line 258: | ||
| style="color:inherit;" | • Detectability (km) || style="color:inherit;" | 10.0 | | style="color:inherit;" | • Detectability (km) || style="color:inherit;" | 10.0 | ||
|- | |- | ||
| style="color:inherit;" | • Bomb name || style="color:inherit;" | | | style="color:inherit;" | • Bomb name || style="color:inherit;" | SC 1000 | ||
|- | |- | ||
| style="color:inherit;" | • Bomb type || style="color:inherit;" | | | style="color:inherit;" | • Bomb type || style="color:inherit;" | High-Explosive (HE) Bomb | ||
|- | |- | ||
| style="color:inherit;" | • Bombs in payload || style="color:inherit;" | 1 | | style="color:inherit;" | • Bombs in payload || style="color:inherit;" | 1 | ||
| Line 282: | Line 285: | ||
==Gallery== | ==Gallery== | ||
<div class="b-popup"><div class="b-popup_head js-tech-nav_head"><div><h2>WoWs Gallery</h2></div><span class="b-tech-nav_arrow"></span></div><div class="b-popup_content" style="display: none;"><div> | <div class="b-popup"><div class="b-popup_head js-tech-nav_head"><div><h2>WoWs Gallery</h2></div><span class="b-tech-nav_arrow"></span></div>[[File:erich_loewenhardt.png|400px]]<div class="b-popup_content" style="display: none;"><div> | ||
<gallery> | <gallery> | ||
Revision as of 00:48, 6 July 2026

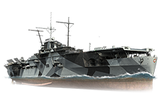
Erich Loewenhardt — Germany Premium Tier VI Aircraft Carrier.
The second ship of the Graf Zeppelin class, aircraft carrier B, was laid down in Kiel in 1938 after the first one had been launched. Her construction proceeded at a slow pace, as the builders aimed to address all the teething problems encountered during the construction of the first ship in the series. By the time World War II broke out, all parts of the carrier's hull up to the armored deck had been completed; however, the German leadership made the decision to complete only those ships that were in the advanced stages of construction. As a result, the order for the second aircraft carrier was canceled in September 1939, and the ship herself was scrapped on the slipway in early 1940.
Pros
- High speed
- High penetration of HE bombs
- High damage of HE bombs
- AP rockets
Cons
- Weak armor
- Low speed
Ship Stats
Hull Information
Secondary Battery
Airstrike
AA Defense
Aircraft
Compatible Upgrades
| Slot 1 |
 |
 |

| ||
|---|---|---|---|---|---|
| Slot 2 |
 |

| |||
| Slot 3 |
 |
 |
 |

| |
| Slot 4 |
 |
 |
 |
 |

|
Consumables
- Slot 1: Damage Control Party
 (30.0s action, 70.0s cooldown)
 - Slot 2: Patrol Fighter
 (4 charges, 600.0s action, 40.0s cooldown)
Gallery
WoWs Gallery

