Ship:Mahan
m Page repair |
Pockington (talk | contribs) added missing information on launch day |
||
| Line 47: | Line 47: | ||
| style="color:inherit;" | • Turning circle radius (m) || style="color:inherit;" | 560 || style="color:inherit;" | 560 | | style="color:inherit;" | • Turning circle radius (m) || style="color:inherit;" | 560 || style="color:inherit;" | 560 | ||
|- | |- | ||
| style="color:inherit;" | • Rudder-shift time (sec) || style="color:inherit;" | | | style="color:inherit;" | • Rudder-shift time (sec) || style="color:inherit;" | 4.0 || style="color:inherit;" | 2.7 | ||
|} | |} | ||
</div> | </div> | ||
| Line 70: | Line 70: | ||
! style="background-color:#1a3244; color:#ffffff; font-weight:bold;" | MAIN BATTERY !! style="background-color:#1a3244; color:#ffffff; font-weight:bold;" | Mk7 mod. 1 !! style="background-color:#1a3244; color:#ffffff; font-weight:bold;" | Mk7 mod. 2 | ! style="background-color:#1a3244; color:#ffffff; font-weight:bold;" | MAIN BATTERY !! style="background-color:#1a3244; color:#ffffff; font-weight:bold;" | Mk7 mod. 1 !! style="background-color:#1a3244; color:#ffffff; font-weight:bold;" | Mk7 mod. 2 | ||
|- | |- | ||
| style="color:inherit;" | • Arrangement || colspan="2" style="color:inherit;" | 5×1 | | style="color:inherit;" | • Arrangement || colspan="2" style="color:inherit;" | 5×1 127mm | ||
|- | |- | ||
| style="color:inherit;" | • Firing range (km) || style="color:inherit;" | 10.61 || style="color:inherit;" | 11.67 | | style="color:inherit;" | • Firing range (km) || style="color:inherit;" | 10.61 || style="color:inherit;" | 11.67 | ||
| Line 178: | Line 178: | ||
{| class="wikitable" style="margin:0 0 0.8em 0; width:100%; color:inherit;" | {| class="wikitable" style="margin:0 0 0.8em 0; width:100%; color:inherit;" | ||
! style="background-color:#1a3244; color:#ffffff; font-weight:bold;" | AA ARMAMENT !! style="background-color:#1a3244; color:#ffffff; font-weight:bold;" | MOUNTS × BARRELS | ! style="background-color:#1a3244; color:#ffffff; font-weight:bold;" | AA ARMAMENT !! style="background-color:#1a3244; color:#ffffff; font-weight:bold;" | MOUNTS × BARRELS | ||
|- | |||
| style="color:inherit;" | 127 mm || style="color:inherit;" | 5 × 1 | |||
|- | |- | ||
| style="color:inherit;" | 13 mm || style="color:inherit;" | 6 × 1 | | style="color:inherit;" | 13 mm || style="color:inherit;" | 6 × 1 | ||
| Line 187: | Line 189: | ||
|- | |- | ||
| style="color:inherit;" | Short-range || style="color:inherit;" | 80.5 || style="color:inherit;" | 95% || style="color:inherit;" | 1.5 | | style="color:inherit;" | Short-range || style="color:inherit;" | 80.5 || style="color:inherit;" | 95% || style="color:inherit;" | 1.5 | ||
|- | |||
| style="color:inherit;" | Long-range || style="color:inherit;" | 31.5 || style="color:inherit;" | 100% || style="color:inherit;" | 5.8 | |||
|} | |||
'''Damage by shell explosions''' | |||
{| class="wikitable" style="margin:0 0 0.8em 0; width:100%; color:inherit;" | |||
! style="background-color:#1a3244; color:#ffffff; font-weight:bold;" | EXPLOSIONS / SALVO !! style="background-color:#1a3244; color:#ffffff; font-weight:bold;" | DAMAGE !! style="background-color:#1a3244; color:#ffffff; font-weight:bold;" | HIT CHANCE !! style="background-color:#1a3244; color:#ffffff; font-weight:bold;" | ACTION ZONE (km) | |||
|- | |||
| style="color:inherit;" | 1 || style="color:inherit;" | 1190 || style="color:inherit;" | 100% || style="color:inherit;" | 3.5–5.8 | |||
|} | |} | ||
| Line 193: | Line 204: | ||
{| class="wikitable" style="margin:0 0 0.8em 0; width:100%; color:inherit;" | {| class="wikitable" style="margin:0 0 0.8em 0; width:100%; color:inherit;" | ||
! style="background-color:#1a3244; color:#ffffff; font-weight:bold;" | AA ARMAMENT !! style="background-color:#1a3244; color:#ffffff; font-weight:bold;" | MOUNTS × BARRELS | ! style="background-color:#1a3244; color:#ffffff; font-weight:bold;" | AA ARMAMENT !! style="background-color:#1a3244; color:#ffffff; font-weight:bold;" | MOUNTS × BARRELS | ||
|- | |||
| style="color:inherit;" | 127 mm || style="color:inherit;" | 5 × 1 | |||
|- | |- | ||
| style="color:inherit;" | 20 mm || style="color:inherit;" | 6 × 1 | | style="color:inherit;" | 20 mm || style="color:inherit;" | 6 × 1 | ||
| Line 202: | Line 215: | ||
|- | |- | ||
| style="color:inherit;" | Short-range || style="color:inherit;" | 70 || style="color:inherit;" | 95% || style="color:inherit;" | 2.0 | | style="color:inherit;" | Short-range || style="color:inherit;" | 70 || style="color:inherit;" | 95% || style="color:inherit;" | 2.0 | ||
|- | |||
| style="color:inherit;" | Long-range || style="color:inherit;" | 31.5 || style="color:inherit;" | 100% || style="color:inherit;" | 5.8 | |||
|} | |||
'''Damage by shell explosions''' | |||
{| class="wikitable" style="margin:0 0 0.8em 0; width:100%; color:inherit;" | |||
! style="background-color:#1a3244; color:#ffffff; font-weight:bold;" | EXPLOSIONS / SALVO !! style="background-color:#1a3244; color:#ffffff; font-weight:bold;" | DAMAGE !! style="background-color:#1a3244; color:#ffffff; font-weight:bold;" | HIT CHANCE !! style="background-color:#1a3244; color:#ffffff; font-weight:bold;" | ACTION ZONE (km) | |||
|- | |||
| style="color:inherit;" | 1 || style="color:inherit;" | 1190 || style="color:inherit;" | 100% || style="color:inherit;" | 3.5–5.8 | |||
|} | |} | ||
</div> | </div> | ||
| Line 214: | Line 236: | ||
| style="color:inherit;" | • Number of charges || style="color:inherit;" | 2 | | style="color:inherit;" | • Number of charges || style="color:inherit;" | 2 | ||
|- | |- | ||
| style="color:inherit;" | • Bombs per charge || style="color:inherit;" | | | style="color:inherit;" | • Bombs per charge || style="color:inherit;" | 8 | ||
|- | |- | ||
| style="color:inherit;" | • Reload time (sec) || style="color:inherit;" | 40.0 | | style="color:inherit;" | • Reload time (sec) || style="color:inherit;" | 40.0 | ||
Latest revision as of 21:34, 9 July 2026

VII
5,350,000
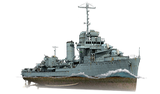
Mahan — U.S.A. Tech Tree Tier VII Destroyer.
The design of the new destroyer was supposed to increase the number of torpedo launchers to three, which was a compromise option to avoid excessive hull enlargement and reduction of her top speed. At the beginning of World War II, USS Mahan served to provide cover for carrier groups during raids on the Marshall Islands. The destroyer then took part in the battle near the Santa Cruz Islands and in the New Guinea campaign, and she also supported the landing forces in New Britain. On December 7, 1944, Mahan was badly damaged by a kamikaze attack in Leyte Gulf.
Pros
- Low detectability
- Enhanced Smoke Generator consumable available
- High rate of fire of main battery armaments
- Defensive AA Fire consumable available
Cons
- Shooting accurately over long ranges is challenging
Ship Stats
Hull Information
Main Battery
Torpedoes
AA Defense
Depth Charges
Compatible Upgrades
| Slot 1 |
 |
 |

| ||
|---|---|---|---|---|---|
| Slot 2 |
 |
 |
 |

| |
| Slot 3 |
 |
 |
 |
 |

|
| Slot 4 |
 |
 |
 |

|
Consumables
- Slot 1: Damage Control Party
 (5.0s action, 40.0s cooldown)
 - Slot 2: Smoke Generator
 (3 charges, 30.0s action, 160.0s cooldown)
 - Slot 3: Engine Boost
 (3 charges, 120.0s action, 120.0s cooldown) or Defensive AA Fire
  (4 charges, 40.0s action, 80.0s cooldown)
Gallery
WoWs Gallery


Historical Gallery
Categories:
