Ship:Tenryū
Redirected page to Ship:Tenryu Tag: New redirect |
Automated stats update via wiki pipeline Tag: Removed redirect |
||
| Line 1: | Line 1: | ||
# | {{#vardefine:ship_name|Tenryū}} | ||
__NOTOC____NOEDITSECTION__ | |||
<div class="b-description gw-frame-1"><div class="b-description-img b-description-img__indent b-description-img__single"><div style="width:160px; height:102px; opacity:.5; border-radius:2px; position:absolute; left:0; top:0; z-index:1; -webkit-transition:all 0.2s ease-out 0.1s; transition:all 0.2s ease-out 0.1s;">[[File:Wows_anno_flag_japan.png|160px]]</div><div class="l-description-img_class"><span class="b-description-img_type b-description-img_type__Cruiser b-description-img_type__Cruiser-Tech Tree"></span><span class="b-description-img_class">III</span></div><div class="b-description-img_vehicle">[[File:Ship_PJSC015_Tatsuta_1919.png|160px|link=|left]]</div><div class="l-description-img_price"><span class="b-description-img_price b-description-img_price__gold"><span title="''{{#var:ship_name}}'' was first released for sale on DD Month YYYY.">256,000</span></span></div></div><p>[[Ship:{{#var:ship_name}}|{{#var:ship_name}}]] — Japan Tech Tree Tier III [[Ship:Cruiser|Cruiser]].</p><p>The Tenryū-class cruisers were intended to be destroyer leaders and were supposed to cooperate in parallel with the Furutaka-class naval scouts. The ships received new 140 mm main battery guns. During World War II, Tenryū was used as an escort ship during the invasions of New Guinea and the Solomon Islands. She participated in the Battle of Savo Island and the Battle of Guadalcanal. On December 19, 1942, near the Port of Madang, Tenryū was torpedoed by American submarine USS Albacore and sank.</p><p> </p></div> | |||
===Pros=== | |||
* Pro 1 | |||
* Pro 2 | |||
===Cons=== | |||
* Con 1 | |||
* Con 2 | |||
==Ship Stats== | |||
<div class="b-popup"><div class="b-popup_head js-tech-nav_head"><div><h2>Hull Information</h2></div><span class="b-tech-nav_arrow"></span></div><div class="b-popup_content" style="display: none;"><div> | |||
<div style="border: 2px solid rgba(212,175,55,0.8); border-radius: 3px; margin-bottom: 1em; overflow: hidden;"> | |||
{| class="wikitable" style="margin:0; color:inherit; width:100%" | |||
! style="background-color:#1a3244; color:#ffffff; font-weight:bold;" | SURVIVABILITY !! style="background-color:#1a3244; color:#ffffff; font-weight:bold;" | Tenryū (A) !! style="background-color:#1a3244; color:#ffffff; font-weight:bold;" | Tenryū (B) | |||
|- | |||
| style="color:inherit;" | • Hit Points || style="color:inherit;" | 15100 || style="color:inherit;" | 17700 | |||
|- | |||
| style="color:inherit;" | • Torpedo protection damage reduction (%) || colspan="2" style="color:inherit;" | — | |||
|} | |||
</div> | |||
<div style="border: 2px solid rgba(212,175,55,0.8); border-radius: 3px; margin-bottom: 1em; overflow: hidden;"> | |||
{| class="wikitable" style="margin:0; color:inherit; width:100%" | |||
! style="background-color:#1a3244; color:#ffffff; font-weight:bold;" | ARMOR DETAIL !! style="background-color:#1a3244; color:#ffffff; font-weight:bold;" | | |||
|- | |||
| style="color:inherit;" | • Belt (mm) || style="color:inherit;" | — | |||
|- | |||
| style="color:inherit;" | • Deck (mm) || style="color:inherit;" | — | |||
|- | |||
| style="color:inherit;" | • Superstructure (mm) || style="color:inherit;" | — | |||
|- | |||
| style="color:inherit;" | • Extremities (mm) || style="color:inherit;" | — | |||
|} | |||
</div> | |||
<div style="border: 2px solid rgba(212,175,55,0.8); border-radius: 3px; margin-bottom: 1em; overflow: hidden;"> | |||
{| class="wikitable" style="margin:0; color:inherit; width:100%" | |||
! style="background-color:#1a3244; color:#ffffff; font-weight:bold;" | MANEUVERABILITY !! style="background-color:#1a3244; color:#ffffff; font-weight:bold;" | Tenryū (A) !! style="background-color:#1a3244; color:#ffffff; font-weight:bold;" | Tenryū (B) | |||
|- | |||
| style="color:inherit;" | • Maximum speed (kt) || style="color:inherit;" | 32.5 || style="color:inherit;" | 32.5 | |||
|- | |||
| style="color:inherit;" | • Turning circle radius (m) || style="color:inherit;" | 560 || style="color:inherit;" | 560 | |||
|- | |||
| style="color:inherit;" | • Rudder-shift time (sec) || style="color:inherit;" | 6.8 || style="color:inherit;" | 5.2 | |||
|} | |||
</div> | |||
<div style="border: 2px solid rgba(212,175,55,0.8); border-radius: 3px; margin-bottom: 1em; overflow: hidden;"> | |||
{| class="wikitable" style="margin:0; color:inherit; width:100%" | |||
! style="background-color:#1a3244; color:#ffffff; font-weight:bold;" | CONCEALMENT !! style="background-color:#1a3244; color:#ffffff; font-weight:bold;" | Tenryū (A) !! style="background-color:#1a3244; color:#ffffff; font-weight:bold;" | Tenryū (B) | |||
|- | |||
| style="color:inherit;" | • Detectability by sea (km) || style="color:inherit;" | 8.03 || style="color:inherit;" | 8.03 | |||
|- | |||
| style="color:inherit;" | • Detectability by air (km) || style="color:inherit;" | 3.82 || style="color:inherit;" | 3.82 | |||
|- | |||
| style="color:inherit;" | • Detectability after firing main guns in smoke (km) || colspan="2" style="color:inherit;" | 3.36 | |||
|- | |||
| style="color:inherit;" | • Detectability by depths (km) || style="color:inherit;" | 3.82 || style="color:inherit;" | 3.82 | |||
|} | |||
</div> | |||
</div></div></div> | |||
<div class="b-popup"><div class="b-popup_head js-tech-nav_head"><div><h2>Main Battery</h2></div><span class="b-tech-nav_arrow"></span></div><div class="b-popup_content" style="display: none;"><div><div style="border: 2px solid rgba(212,175,55,0.8); border-radius: 3px; margin-bottom: 1em; overflow: hidden;"> | |||
{| class="wikitable" style="margin:0; color:inherit; width:100%" | |||
! style="background-color:#1a3244; color:#ffffff; font-weight:bold;" | MAIN BATTERY !! style="background-color:#1a3244; color:#ffffff; font-weight:bold;" | Type3 mod. 1 !! style="background-color:#1a3244; color:#ffffff; font-weight:bold;" | Type3 mod. 2 | |||
|- | |||
| style="color:inherit;" | • Arrangement || colspan="2" style="color:inherit;" | 4×1 140mm | |||
|- | |||
| style="color:inherit;" | • Firing range (km) || style="color:inherit;" | 11.24 || style="color:inherit;" | 12.36 | |||
|- | |||
| style="color:inherit;" | • Reload time (sec) || colspan="2" style="color:inherit;" | 6.0 | |||
|- | |||
| style="color:inherit;" | • Rate of fire (shots/min) || colspan="2" style="color:inherit;" | 10 | |||
|- | |||
| style="color:inherit;" | • 180° turn time (sec) || colspan="2" style="color:inherit;" | 21.2 | |||
|} | |||
</div> | |||
<div style="border: 2px solid rgba(212,175,55,0.8); border-radius: 3px; margin-bottom: 1em; overflow: hidden;"> | |||
{| class="wikitable" style="margin:0; color:inherit; width:100%" | |||
! style="background-color:#1a3244; color:#ffffff; font-weight:bold;" | DISPERSION !! style="background-color:#1a3244; color:#ffffff; font-weight:bold;" | | |||
|- | |||
| style="color:inherit;" | • Dispersion type || style="color:inherit;" | Standard CA/CL dispersion | |||
|- | |||
| style="color:inherit;" | • Dispersion formula || style="color:inherit;" | Dispersion (m) = 6.9 × range(km) + 33 | |||
|- | |||
| style="color:inherit;" | • Sigma || style="color:inherit;" | 2.0 | |||
|- | |||
| style="color:inherit;" | • Maximum dispersion (m) || style="color:inherit;" | 110 | |||
|- | |||
| style="color:inherit;" | • Dispersion at 5 km || style="color:inherit;" | 68 | |||
|- | |||
| style="color:inherit;" | • Dispersion at 10 km || style="color:inherit;" | 102 | |||
|- | |||
| style="color:inherit;" | • Dispersion at 11.24 km || style="color:inherit;" | 111 | |||
|} | |||
</div> | |||
<div style="border: 2px solid rgba(212,175,55,0.8); border-radius: 3px; margin-bottom: 1em; overflow: hidden;"> | |||
{| class="wikitable" style="margin:0; color:inherit; width:100%" | |||
! style="background-color:#1a3244; color:#ffffff; font-weight:bold;" | HE SHELL !! style="background-color:#1a3244; color:#ffffff; font-weight:bold;" | | |||
|- | |||
| style="color:inherit;" | • Name || style="color:inherit;" | 140 mm HE Type0 | |||
|- | |||
| style="color:inherit;" | • Maximum damage || style="color:inherit;" | 2400 | |||
|- | |||
| style="color:inherit;" | • Fire chance (%) || style="color:inherit;" | 10.0% | |||
|- | |||
| style="color:inherit;" | • Shell velocity (m/s) || style="color:inherit;" | 850 | |||
|- | |||
| style="color:inherit;" | • Shell weight (kg) || style="color:inherit;" | 38 | |||
|- | |||
| style="color:inherit;" | • Penetration (mm) || style="color:inherit;" | 23 | |||
|} | |||
</div> | |||
<div style="border: 2px solid rgba(212,175,55,0.8); border-radius: 3px; margin-bottom: 1em; overflow: hidden;"> | |||
{| class="wikitable" style="margin:0; color:inherit; width:100%" | |||
! style="background-color:#1a3244; color:#ffffff; font-weight:bold;" | AP SHELL !! style="background-color:#1a3244; color:#ffffff; font-weight:bold;" | | |||
|- | |||
| style="color:inherit;" | • Name || style="color:inherit;" | 140 mm Capped Common Shell | |||
|- | |||
| style="color:inherit;" | • Maximum damage || style="color:inherit;" | 2700 | |||
|- | |||
| style="color:inherit;" | • Shell velocity (m/s) || style="color:inherit;" | 850 | |||
|- | |||
| style="color:inherit;" | • Shell weight (kg) || style="color:inherit;" | 38 | |||
|- | |||
| style="color:inherit;" | • Fuse time (sec) || style="color:inherit;" | 0.025 | |||
|- | |||
| style="color:inherit;" | • Ricochet start (°) || style="color:inherit;" | 45 | |||
|- | |||
| style="color:inherit;" | • Always ricochet (°) || style="color:inherit;" | 60 | |||
|- | |||
| style="color:inherit;" | • Normalisation (°) || style="color:inherit;" | 8.5 | |||
|- | |||
| style="color:inherit;" | • Arming threshold (mm) || style="color:inherit;" | 23 | |||
|} | |||
</div> | |||
</div></div></div> | |||
<div class="b-popup"><div class="b-popup_head js-tech-nav_head"><div><h2>Torpedoes</h2></div><span class="b-tech-nav_arrow"></span></div><div class="b-popup_content" style="display: none;"><div> | |||
<div style="border: 2px solid rgba(212,175,55,0.8); border-radius: 3px; margin-bottom: 1em; overflow: hidden;"> | |||
{| class="wikitable" style="margin:0; color:inherit; width:100%" | |||
! style="background-color:#1a3244; color:#ffffff; font-weight:bold;" | TORPEDO LAUNCHERS !! style="background-color:#1a3244; color:#ffffff; font-weight:bold;" | | |||
|- | |||
| style="color:inherit;" | • Number of launchers || style="color:inherit;" | 1 | |||
|- | |||
| style="color:inherit;" | • Torpedo name || style="color:inherit;" | PJPT008 | |||
|- | |||
| style="color:inherit;" | • Reload time (sec) || style="color:inherit;" | 58.0 | |||
|- | |||
| style="color:inherit;" | • 180° turn time (sec) || style="color:inherit;" | 7.2 | |||
|- | |||
| style="color:inherit;" | • Damage || style="color:inherit;" | 24800 | |||
|- | |||
| style="color:inherit;" | • Range (km) || style="color:inherit;" | 0.2 | |||
|- | |||
| style="color:inherit;" | • Speed (kt) || style="color:inherit;" | 57 | |||
|- | |||
| style="color:inherit;" | • Detectability (km) || style="color:inherit;" | 1.2 | |||
|- | |||
| style="color:inherit;" | • Flooding chance (%) || style="color:inherit;" | 1.45% | |||
|} | |||
</div> | |||
</div></div></div> | |||
<div class="b-popup"><div class="b-popup_head js-tech-nav_head"><div><h2>AA Defense</h2></div><span class="b-tech-nav_arrow"></span></div><div class="b-popup_content" style="display: none;"><div> | |||
<div style="border: 2px solid rgba(212,175,55,0.8); border-radius: 3px; margin-bottom: 1em; overflow: hidden;"> | |||
'''Tenryū (A)''' | |||
{| class="wikitable" style="margin:0 0 0.8em 0; width:100%; color:inherit;" | |||
! style="background-color:#1a3244; color:#ffffff; font-weight:bold;" | AA ARMAMENT !! style="background-color:#1a3244; color:#ffffff; font-weight:bold;" | MOUNTS × BARRELS | |||
|- | |||
| style="color:inherit;" | 76 mm || style="color:inherit;" | 1 × 1 | |||
|- | |||
| style="color:inherit;" | 6 mm || style="color:inherit;" | 2 × 1 | |||
|} | |||
'''Continuous damage''' — average DPS within each action zone | |||
{| class="wikitable" style="margin:0 0 0.8em 0; width:100%; color:inherit;" | |||
! style="background-color:#1a3244; color:#ffffff; font-weight:bold;" | RANGE !! style="background-color:#1a3244; color:#ffffff; font-weight:bold;" | DPS !! style="background-color:#1a3244; color:#ffffff; font-weight:bold;" | HIT CHANCE !! style="background-color:#1a3244; color:#ffffff; font-weight:bold;" | ACTION ZONE (km) | |||
|- | |||
| style="color:inherit;" | Short-range || style="color:inherit;" | 7 || style="color:inherit;" | 85% || style="color:inherit;" | 1.5 | |||
|- | |||
| style="color:inherit;" | Long-range || style="color:inherit;" | 3.5 || style="color:inherit;" | 90% || style="color:inherit;" | 3.0 | |||
|} | |||
'''Tenryū (B)''' | |||
{| class="wikitable" style="margin:0 0 0.8em 0; width:100%; color:inherit;" | |||
! style="background-color:#1a3244; color:#ffffff; font-weight:bold;" | AA ARMAMENT !! style="background-color:#1a3244; color:#ffffff; font-weight:bold;" | MOUNTS × BARRELS | |||
|- | |||
| style="color:inherit;" | 76 mm || style="color:inherit;" | 1 × 1 | |||
|- | |||
| style="color:inherit;" | 13 mm || style="color:inherit;" | 2 × 1 | |||
|} | |||
'''Continuous damage''' — average DPS within each action zone | |||
{| class="wikitable" style="margin:0 0 0.8em 0; width:100%; color:inherit;" | |||
! style="background-color:#1a3244; color:#ffffff; font-weight:bold;" | RANGE !! style="background-color:#1a3244; color:#ffffff; font-weight:bold;" | DPS !! style="background-color:#1a3244; color:#ffffff; font-weight:bold;" | HIT CHANCE !! style="background-color:#1a3244; color:#ffffff; font-weight:bold;" | ACTION ZONE (km) | |||
|- | |||
| style="color:inherit;" | Short-range || style="color:inherit;" | 7 || style="color:inherit;" | 85% || style="color:inherit;" | 1.5 | |||
|- | |||
| style="color:inherit;" | Long-range || style="color:inherit;" | 3.5 || style="color:inherit;" | 90% || style="color:inherit;" | 3.0 | |||
|} | |||
</div> | |||
</div></div></div> | |||
<!-- Add the ship code here to populate the upgrade table --> | |||
{{Ship Upgrades Section|code=PJSC015_Tatsuta_1919}} | |||
<!-- Consumables have to be tagged individually on a slot by slot basis --> | |||
{{Ship Consumables Section|consumables= | |||
* '''Slot 1:''' {{Damage Control Party}} (5.0s action, 60.0s cooldown) | |||
}} | |||
==Gallery== | |||
<div class="b-popup"><div class="b-popup_head js-tech-nav_head"><div><h2>WoWs Gallery</h2></div><span class="b-tech-nav_arrow"></span></div><div class="b-popup_content" style="display: none;"><div> | |||
<gallery> | |||
</gallery> | |||
</div></div></div> | |||
<div class="b-popup"><div class="b-popup_head js-tech-nav_head"><div><h2>Historical Gallery</h2></div><span class="b-tech-nav_arrow"></span></div><div class="b-popup_content" style="display: none;"><div> | |||
<gallery> | |||
</gallery> | |||
</div></div></div> | |||
[[Category:Ships of Japan]] | |||
[[Category:Cruisers]] | |||
[[Category:Tier III ships]] | |||
<!-- DO NOT DELETE THIS LINE. DO NOT INSERT ANYTHING BELOW THIS LINE --> | |||
Revision as of 04:05, 30 June 2026

III
256,000
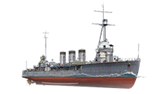
Tenryū — Japan Tech Tree Tier III Cruiser.
The Tenryū-class cruisers were intended to be destroyer leaders and were supposed to cooperate in parallel with the Furutaka-class naval scouts. The ships received new 140 mm main battery guns. During World War II, Tenryū was used as an escort ship during the invasions of New Guinea and the Solomon Islands. She participated in the Battle of Savo Island and the Battle of Guadalcanal. On December 19, 1942, near the Port of Madang, Tenryū was torpedoed by American submarine USS Albacore and sank.
Pros
- Pro 1
- Pro 2
Cons
- Con 1
- Con 2
Ship Stats
Hull Information
Main Battery
Torpedoes
AA Defense
Compatible Upgrades
| Slot 1 |
 |
 |

|
|---|---|---|---|
| Slot 2 |
 |

|
Consumables
- Slot 1: Damage Control Party
 (5.0s action, 60.0s cooldown)
Gallery
WoWs Gallery
Historical Gallery
Categories:
