Ship:Gallant
Automated stats update via wiki pipeline |
No edit summary |
||
| Line 5: | Line 5: | ||
===Pros=== | ===Pros=== | ||
* | * High maneuverability | ||
* | * Low detectability | ||
* Torpedo tubes with the ability to launch torpedoes one by one | |||
===Cons=== | ===Cons=== | ||
* | * Low AA defense efficiency | ||
==Ship Stats== | ==Ship Stats== | ||
| Line 21: | Line 20: | ||
| style="color:inherit;" | • Hit Points || style="color:inherit;" | 12000 | | style="color:inherit;" | • Hit Points || style="color:inherit;" | 12000 | ||
|- | |- | ||
| style="color:inherit;" | • Torpedo protection damage reduction (%) || style="color:inherit;" | | | style="color:inherit;" | • Torpedo protection damage reduction (%) || style="color:inherit;" | 0% | ||
|} | |} | ||
</div> | </div> | ||
| Line 29: | Line 28: | ||
! style="background-color:#1a3244; color:#ffffff; font-weight:bold;" | ARMOR DETAIL !! style="background-color:#1a3244; color:#ffffff; font-weight:bold;" | | ! style="background-color:#1a3244; color:#ffffff; font-weight:bold;" | ARMOR DETAIL !! style="background-color:#1a3244; color:#ffffff; font-weight:bold;" | | ||
|- | |- | ||
| style="color:inherit;" | • Belt (mm) || style="color:inherit;" | | | style="color:inherit;" | • Belt (mm) || style="color:inherit;" | 16 | ||
|- | |- | ||
| style="color:inherit;" | • Deck (mm) || style="color:inherit;" | | | style="color:inherit;" | • Deck (mm) || style="color:inherit;" | 16 | ||
|- | |- | ||
| style="color:inherit;" | • Superstructure (mm) || style="color:inherit;" | | | style="color:inherit;" | • Superstructure (mm) || style="color:inherit;" | 10 | ||
|- | |- | ||
| style="color:inherit;" | • Extremities (mm) || style="color:inherit;" | | | style="color:inherit;" | • Extremities (mm) || style="color:inherit;" | 16 | ||
|} | |} | ||
</div> | </div> | ||
| Line 47: | Line 46: | ||
| style="color:inherit;" | • Turning circle radius (m) || style="color:inherit;" | 540 | | style="color:inherit;" | • Turning circle radius (m) || style="color:inherit;" | 540 | ||
|- | |- | ||
| style="color:inherit;" | • Rudder-shift time (sec) || style="color:inherit;" | 3. | | style="color:inherit;" | • Rudder-shift time (sec) || style="color:inherit;" | 3.0 | ||
|} | |} | ||
</div> | </div> | ||
| Line 152: | Line 151: | ||
| style="color:inherit;" | • Number of launchers || style="color:inherit;" | 1 | | style="color:inherit;" | • Number of launchers || style="color:inherit;" | 1 | ||
|- | |- | ||
| style="color:inherit;" | • Torpedo name || style="color:inherit;" | | | style="color:inherit;" | • Torpedo name || style="color:inherit;" | 533 mm Mk IX | ||
|- | |- | ||
| style="color:inherit;" | • Reload time (sec) || style="color:inherit;" | 96.0 | | style="color:inherit;" | • Reload time (sec) || style="color:inherit;" | 96.0 | ||
| Line 158: | Line 157: | ||
| style="color:inherit;" | • 180° turn time (sec) || style="color:inherit;" | 7.2 | | style="color:inherit;" | • 180° turn time (sec) || style="color:inherit;" | 7.2 | ||
|- | |- | ||
| style="color:inherit;" | • Damage || style="color:inherit;" | | | style="color:inherit;" | • Damage || style="color:inherit;" | 15433 | ||
|- | |- | ||
| style="color:inherit;" | • Range (km) || style="color:inherit;" | 0 | | style="color:inherit;" | • Range (km) || style="color:inherit;" | 8.0 | ||
|- | |- | ||
| style="color:inherit;" | • Speed (kt) || style="color:inherit;" | 61 | | style="color:inherit;" | • Speed (kt) || style="color:inherit;" | 61 | ||
| Line 166: | Line 165: | ||
| style="color:inherit;" | • Detectability (km) || style="color:inherit;" | 1.3 | | style="color:inherit;" | • Detectability (km) || style="color:inherit;" | 1.3 | ||
|- | |- | ||
| style="color:inherit;" | • Flooding chance (%) || style="color:inherit;" | | | style="color:inherit;" | • Flooding chance (%) || style="color:inherit;" | 257% | ||
|} | |} | ||
</div> | </div> | ||
| Line 196: | Line 195: | ||
| style="color:inherit;" | • Number of charges || style="color:inherit;" | 2 | | style="color:inherit;" | • Number of charges || style="color:inherit;" | 2 | ||
|- | |- | ||
| style="color:inherit;" | • Bombs per charge || style="color:inherit;" | | | style="color:inherit;" | • Bombs per charge || style="color:inherit;" | 8 | ||
|- | |- | ||
| style="color:inherit;" | • Reload time (sec) || style="color:inherit;" | 40.0 | | style="color:inherit;" | • Reload time (sec) || style="color:inherit;" | 40.0 | ||
| Line 218: | Line 217: | ||
==Gallery== | ==Gallery== | ||
<div class="b-popup"><div class="b-popup_head js-tech-nav_head"><div><h2>WoWs Gallery</h2></div><span class="b-tech-nav_arrow"></span></div><div class="b-popup_content" style="display: none;"><div> | <div class="b-popup"><div class="b-popup_head js-tech-nav_head"><div><h2>WoWs Gallery</h2></div><span class="b-tech-nav_arrow"></span></div><div class="b-popup_content" style="display: none;"><div> | ||
[[File:Gallant_ingame_2026.png|400px]] | |||
<gallery> | <gallery> | ||
</gallery> | </gallery> | ||
Latest revision as of 01:59, 6 July 2026

VI
4,500 doubloons
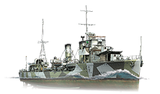
Gallant — U.K. Premium Tier VI Destroyer.
During the Spanish Civil War, HMS Gallant—a G-class destroyer—spent considerable time in Spanish waters, enforcing the arms blockade imposed by Britain and France on both sides of the conflict. In 1940, the destroyer participated in the evacuation of Allied troops from Dunkirk and also escorted convoys bound for Malta. During one such convoy run, she was damaged after colliding with a mine. Gallant was towed to Malta for repairs, where she then suffered further damage during an Italian and German air raid. The damage was so extensive that it made the ship uneconomical to repair. In 1943, Gallant was scuttled as a block ship in the fairway to prevent possible hostile landings.
Pros
- High maneuverability
- Low detectability
- Torpedo tubes with the ability to launch torpedoes one by one
Cons
- Low AA defense efficiency
Ship Stats
Hull Information
Main Battery
Torpedoes
AA Defense
Depth Charges
Compatible Upgrades
| Slot 1 |
 |
 |

| ||
|---|---|---|---|---|---|
| Slot 2 |
 |
 |

| ||
| Slot 3 |
 |
 |
 |
 |

|
| Slot 4 |
 |
 |
 |

|
Consumables
- Slot 1: Damage Control Party
 (5.0s action, 40.0s cooldown)
 - Slot 2: Smoke Generator
 (3 charges, 20.0s action, 160.0s cooldown)
 - Slot 3: Engine Boost
 (3 charges, 120.0s action, 120.0s cooldown)

