Ship:Minekaze
Automated stats update via wiki pipeline |
Pockington (talk | contribs) added missing information on launch day |
||
| Line 5: | Line 5: | ||
===Pros=== | ===Pros=== | ||
* | * Heavy HE shell damage per salvo. | ||
* | * Heavy torpedo damage. | ||
* Low detectability. | |||
===Cons=== | ===Cons=== | ||
* | * Low rate of fire. | ||
* | * High torpedo detectability. | ||
| Line 21: | Line 22: | ||
| style="color:inherit;" | • Hit Points || style="color:inherit;" | 9600 || style="color:inherit;" | 10900 | | style="color:inherit;" | • Hit Points || style="color:inherit;" | 9600 || style="color:inherit;" | 10900 | ||
|- | |- | ||
| style="color:inherit;" | • Torpedo protection damage reduction (%) || colspan="2" style="color:inherit;" | | | style="color:inherit;" | • Torpedo protection damage reduction (%) || colspan="2" style="color:inherit;" | 0 | ||
|} | |} | ||
</div> | </div> | ||
| Line 29: | Line 30: | ||
! style="background-color:#1a3244; color:#ffffff; font-weight:bold;" | ARMOR DETAIL !! style="background-color:#1a3244; color:#ffffff; font-weight:bold;" | | ! style="background-color:#1a3244; color:#ffffff; font-weight:bold;" | ARMOR DETAIL !! style="background-color:#1a3244; color:#ffffff; font-weight:bold;" | | ||
|- | |- | ||
| style="color:inherit;" | • Belt (mm) || style="color:inherit;" | | | style="color:inherit;" | • Belt (mm) || style="color:inherit;" | 14 | ||
|- | |- | ||
| style="color:inherit;" | • Deck (mm) || style="color:inherit;" | | | style="color:inherit;" | • Deck (mm) || style="color:inherit;" | 14 | ||
|- | |- | ||
| style="color:inherit;" | • Superstructure (mm) || style="color:inherit;" | | | style="color:inherit;" | • Superstructure (mm) || style="color:inherit;" | 10 | ||
|- | |- | ||
| style="color:inherit;" | • Extremities (mm) || style="color:inherit;" | | | style="color:inherit;" | • Extremities (mm) || style="color:inherit;" | 10 | ||
|} | |} | ||
</div> | </div> | ||
| Line 47: | Line 48: | ||
| style="color:inherit;" | • Turning circle radius (m) || style="color:inherit;" | 550 || style="color:inherit;" | 550 | | style="color:inherit;" | • Turning circle radius (m) || style="color:inherit;" | 550 || style="color:inherit;" | 550 | ||
|- | |- | ||
| style="color:inherit;" | • Rudder-shift time (sec) || style="color:inherit;" | | | style="color:inherit;" | • Rudder-shift time (sec) || style="color:inherit;" | 3.2 || style="color:inherit;" | 2.1 | ||
|} | |} | ||
</div> | </div> | ||
| Line 148: | Line 149: | ||
! style="background-color:#1a3244; color:#ffffff; font-weight:bold;" | TORPEDO LAUNCHERS !! style="background-color:#1a3244; color:#ffffff; font-weight:bold;" | | ! style="background-color:#1a3244; color:#ffffff; font-weight:bold;" | TORPEDO LAUNCHERS !! style="background-color:#1a3244; color:#ffffff; font-weight:bold;" | | ||
|- | |- | ||
| style="color:inherit;" | • | | style="color:inherit;" | • Torpedo tubes (launchers × tubes) || style="color:inherit;" | 3 × 2 | ||
|- | |- | ||
| style="color:inherit;" | • Torpedo name || style="color:inherit;" | | | style="color:inherit;" | • Torpedo name || style="color:inherit;" | 533 mm Type6 | ||
|- | |- | ||
| style="color:inherit;" | • Reload time (sec) || style="color:inherit;" | 42 | | style="color:inherit;" | • Reload time (sec) || style="color:inherit;" | 42 | ||
|- | |- | ||
| style="color:inherit;" | • 180° turn time (sec) || style="color:inherit;" | 7.2 | | style="color:inherit;" | • 180° turn time (sec) || style="color:inherit;" | 7.2 | ||
|- | |- | ||
| style="color:inherit;" | • Damage || style="color:inherit;" | | | style="color:inherit;" | • Damage || style="color:inherit;" | 10,833 | ||
|- | |- | ||
| style="color:inherit;" | • Range (km) || style="color:inherit;" | 0 | | style="color:inherit;" | • Range (km) || style="color:inherit;" | 7.0 | ||
|- | |- | ||
| style="color:inherit;" | • Speed (kt) || style="color:inherit;" | 57 | | style="color:inherit;" | • Speed (kt) || style="color:inherit;" | 57 | ||
| Line 164: | Line 165: | ||
| style="color:inherit;" | • Detectability (km) || style="color:inherit;" | 1.2 | | style="color:inherit;" | • Detectability (km) || style="color:inherit;" | 1.2 | ||
|- | |- | ||
| style="color:inherit;" | • Flooding chance (%) || style="color:inherit;" | | | style="color:inherit;" | • Flooding chance (%) || style="color:inherit;" | 175 | ||
|} | |} | ||
</div> | </div> | ||
| Line 215: | Line 216: | ||
| style="color:inherit;" | • Number of charges || style="color:inherit;" | 2 | | style="color:inherit;" | • Number of charges || style="color:inherit;" | 2 | ||
|- | |- | ||
| style="color:inherit;" | • Bombs per charge || style="color:inherit;" | | | style="color:inherit;" | • Bombs per charge || style="color:inherit;" | 4 | ||
|- | |- | ||
| style="color:inherit;" | • Reload time (sec) || style="color:inherit;" | 40.0 | | style="color:inherit;" | • Reload time (sec) || style="color:inherit;" | 40.0 | ||
| Line 239: | Line 240: | ||
<gallery> | <gallery> | ||
</gallery> | </gallery>[[File:Minekazeinport.png|thumb]]</div></div></div> | ||
</div></div></div> | |||
<div class="b-popup"><div class="b-popup_head js-tech-nav_head"><div><h2>Historical Gallery</h2></div><span class="b-tech-nav_arrow"></span></div><div class="b-popup_content" style="display: none;"><div> | <div class="b-popup"><div class="b-popup_head js-tech-nav_head"><div><h2>Historical Gallery</h2></div><span class="b-tech-nav_arrow"></span></div><div class="b-popup_content" style="display: none;"><div> | ||
Latest revision as of 14:16, 9 July 2026

V
1,380,000
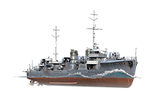
Minekaze — Japan Tech Tree Tier V Destroyer.
The "large" destroyers were conceived to escort Amagi-class battlecruisers. They featured an extended forecastle, and the bridge was set well back from its break—a bank of torpedo tubes was mounted in the well thus created. The Minekaze class was the first mass-produced Japanese destroyer to be equipped with geared turbines. The lead ship was laid down in April 1918. She escorted aircraft carrier Akagi in the 1930s and patrolled the Chinese coast during the Sino-Japanese War. Throughout World War II, the ship was engaged in patrol and escort duties in the East China Sea and Western Pacific regions.
Pros
- Heavy HE shell damage per salvo.
- Heavy torpedo damage.
- Low detectability.
Cons
- Low rate of fire.
- High torpedo detectability.
Ship Stats
Hull Information
Main Battery
Torpedoes
AA Defense
Depth Charges
Compatible Upgrades
| Slot 1 |
 |
 |

| ||
|---|---|---|---|---|---|
| Slot 2 |
 |
 |

| ||
| Slot 3 |
 |
 |
 |
 |

|
Consumables
- Slot 1: Damage Control Party
 (5.0s action, 40.0s cooldown)
 - Slot 2: Smoke Generator
 (3 charges, 20.0s action, 160.0s cooldown)
 - Slot 3: Engine Boost
 (3 charges, 120.0s action, 120.0s cooldown)
Gallery
WoWs Gallery

Historical Gallery
Categories:
