Ship:Ignacio Allende
No edit summary |
Pockington (talk | contribs) corrected info |
||
| Line 50: | Line 50: | ||
| style="color:inherit;" | • Turning circle radius (m) || style="color:inherit;" | 660 || style="color:inherit;" | 660 | | style="color:inherit;" | • Turning circle radius (m) || style="color:inherit;" | 660 || style="color:inherit;" | 660 | ||
|- | |- | ||
| style="color:inherit;" | • Rudder-shift time (sec) || style="color:inherit;" | | | style="color:inherit;" | • Rudder-shift time (sec) || style="color:inherit;" | 13.9 || style="color:inherit;" | 9.9 | ||
|} | |} | ||
</div> | </div> | ||
| Line 134: | Line 134: | ||
<div style="border: 2px solid rgba(212,175,55,0.8); border-radius: 3px; margin-bottom: 1em; overflow: hidden;"> | <div style="border: 2px solid rgba(212,175,55,0.8); border-radius: 3px; margin-bottom: 1em; overflow: hidden;"> | ||
{| class="wikitable" style="margin:0; color:inherit; width:100%" | {| class="wikitable" style="margin:0; color:inherit; width:100%" | ||
! style="background-color:#1a3244; color:#ffffff; font-weight:bold;" | TORPEDO LAUNCHERS !! style="background-color:#1a3244; color:#ffffff; font-weight:bold;" | | ! style="background-color:#1a3244; color:#ffffff; font-weight:bold;" | TORPEDO LAUNCHERS !! style="background-color:#1a3244; color:#ffffff; font-weight:bold;" | 533 mm Mk 15B | ||
|- | |- | ||
| style="color:inherit;" | • | | style="color:inherit;" | • Torpedo tubes (launchers × tubes) || style="color:inherit;" | 2 × 4 | ||
|- | |- | ||
| style="color:inherit;" | • Torpedo name || style="color:inherit;" | 533 mm | | style="color:inherit;" | • Torpedo name || style="color:inherit;" | 533 mm Mk 15B | ||
|- | |- | ||
| style="color:inherit;" | • Reload time (sec) || style="color:inherit;" | 96 | | style="color:inherit;" | • Reload time (sec) || style="color:inherit;" | 96 | ||
|- | |- | ||
| style="color:inherit;" | • 180° turn time (sec) || style="color:inherit;" | 7.2 | | style="color:inherit;" | • 180° turn time (sec) || style="color:inherit;" | 7.2 | ||
|- | |- | ||
| style="color:inherit;" | • Damage || style="color:inherit;" | | | style="color:inherit;" | • Damage || style="color:inherit;" | 16,633 | ||
|- | |- | ||
| style="color:inherit;" | • Range (km) || style="color:inherit;" | 6 | | style="color:inherit;" | • Range (km) || style="color:inherit;" | 6.0 | ||
|- | |- | ||
| style="color:inherit;" | • Speed (kt) || style="color:inherit;" | 62 | | style="color:inherit;" | • Speed (kt) || style="color:inherit;" | 62 | ||
| Line 152: | Line 152: | ||
| style="color:inherit;" | • Detectability (km) || style="color:inherit;" | 1.1 | | style="color:inherit;" | • Detectability (km) || style="color:inherit;" | 1.1 | ||
|- | |- | ||
| style="color:inherit;" | • Flooding chance (%) || style="color:inherit;" | | | style="color:inherit;" | • Flooding chance (%) || style="color:inherit;" | 279 | ||
|} | |} | ||
</div> | </div> | ||
| Line 185: | Line 185: | ||
{| class="wikitable" style="margin:0 0 0.8em 0; width:100%; color:inherit;" | {| class="wikitable" style="margin:0 0 0.8em 0; width:100%; color:inherit;" | ||
! style="background-color:#1a3244; color:#ffffff; font-weight:bold;" | AA ARMAMENT !! style="background-color:#1a3244; color:#ffffff; font-weight:bold;" | MOUNTS × BARRELS | ! style="background-color:#1a3244; color:#ffffff; font-weight:bold;" | AA ARMAMENT !! style="background-color:#1a3244; color:#ffffff; font-weight:bold;" | MOUNTS × BARRELS | ||
|- | |||
| style="color:inherit;" | 152 mm || style="color:inherit;" | 4 × 2 | |||
|- | |- | ||
| style="color:inherit;" | 76 mm || style="color:inherit;" | 3 × 2 | | style="color:inherit;" | 76 mm || style="color:inherit;" | 3 × 2 | ||
| Line 198: | Line 200: | ||
|- | |- | ||
| style="color:inherit;" | Mid-range || style="color:inherit;" | 112 || style="color:inherit;" | 90% || style="color:inherit;" | 4.0 | | style="color:inherit;" | Mid-range || style="color:inherit;" | 112 || style="color:inherit;" | 90% || style="color:inherit;" | 4.0 | ||
|- | |||
| style="color:inherit;" | Long-range || style="color:inherit;" | 101.5 || style="color:inherit;" | 90% || style="color:inherit;" | 6.9 | |||
|} | |||
'''Damage by shell explosions''' | |||
{| class="wikitable" style="margin:0 0 0.8em 0; width:100%; color:inherit;" | |||
! style="background-color:#1a3244; color:#ffffff; font-weight:bold;" | EXPLOSIONS / SALVO !! style="background-color:#1a3244; color:#ffffff; font-weight:bold;" | DAMAGE !! style="background-color:#1a3244; color:#ffffff; font-weight:bold;" | HIT CHANCE !! style="background-color:#1a3244; color:#ffffff; font-weight:bold;" | ACTION ZONE (km) | |||
|- | |||
| style="color:inherit;" | 5 || style="color:inherit;" | 1680 || style="color:inherit;" | 90% || style="color:inherit;" | 3.5–6.9 | |||
|} | |} | ||
| Line 204: | Line 215: | ||
{| class="wikitable" style="margin:0 0 0.8em 0; width:100%; color:inherit;" | {| class="wikitable" style="margin:0 0 0.8em 0; width:100%; color:inherit;" | ||
! style="background-color:#1a3244; color:#ffffff; font-weight:bold;" | AA ARMAMENT !! style="background-color:#1a3244; color:#ffffff; font-weight:bold;" | MOUNTS × BARRELS | ! style="background-color:#1a3244; color:#ffffff; font-weight:bold;" | AA ARMAMENT !! style="background-color:#1a3244; color:#ffffff; font-weight:bold;" | MOUNTS × BARRELS | ||
|- | |||
| style="color:inherit;" | 152 mm || style="color:inherit;" | 4 × 2 | |||
|- | |- | ||
| style="color:inherit;" | 76 mm || style="color:inherit;" | 3 × 2 | | style="color:inherit;" | 76 mm || style="color:inherit;" | 3 × 2 | ||
| Line 217: | Line 230: | ||
|- | |- | ||
| style="color:inherit;" | Mid-range || style="color:inherit;" | 108.5 || style="color:inherit;" | 90% || style="color:inherit;" | 4.0 | | style="color:inherit;" | Mid-range || style="color:inherit;" | 108.5 || style="color:inherit;" | 90% || style="color:inherit;" | 4.0 | ||
|- | |||
| style="color:inherit;" | Long-range || style="color:inherit;" | 101.5 || style="color:inherit;" | 90% || style="color:inherit;" | 6.9 | |||
|} | |||
'''Damage by shell explosions''' | |||
{| class="wikitable" style="margin:0 0 0.8em 0; width:100%; color:inherit;" | |||
! style="background-color:#1a3244; color:#ffffff; font-weight:bold;" | EXPLOSIONS / SALVO !! style="background-color:#1a3244; color:#ffffff; font-weight:bold;" | DAMAGE !! style="background-color:#1a3244; color:#ffffff; font-weight:bold;" | HIT CHANCE !! style="background-color:#1a3244; color:#ffffff; font-weight:bold;" | ACTION ZONE (km) | |||
|- | |||
| style="color:inherit;" | 5 || style="color:inherit;" | 1680 || style="color:inherit;" | 90% || style="color:inherit;" | 3.5–6.9 | |||
|} | |} | ||
</div> | </div> | ||
Revision as of 23:48, 10 July 2026

VIII
9,000,000
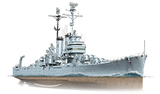
Ignacio Allende — Pan-America Tech Tree Tier VIII Cruiser.
In 1947, the Inter-American Treaty of Reciprocal Assistance was signed in Rio de Janeiro, whereby Argentina, Brazil, and Chile were to strengthen their fleets by purchasing old U.S. Brooklyn-class cruisers. If those countries had ordered the construction of new cruisers in the United States, then the most modern Worcester-class ships would have been used as the basis for the projects.
Pros
- Access to the specialized repair team consumables. (restores a considerable portion of the ship’s HP by repairing damage within a short period of time).
- High rate of fire.
- Surveillance radar consumables available.
Cons
- Weak armor.
- High consumable cooldown time.
- Only AP shells are available.
Ship Stats
Hull Information
Main Battery
Torpedoes
Airstrike
AA Defense
Combat Instructions
Compatible Upgrades
| Slot 1 |
 |
 |
 |

| |
|---|---|---|---|---|---|
| Slot 2 |
 |
 |
 |
 |

|
| Slot 3 |
 |
 |
 |

| |
| Slot 4 |
 |
 |
 |

| |
| Slot 5 |
 |
 |
 |

|
Consumables
- Slot 1: Damage Control Party
 (5.0s action, 60.0s cooldown)
 - Slot 2: Repair Party
 (4 charges, 20.0s action, 180.0s cooldown, 418.8 hp/s)
 - Slot 3: Hydroacoustic Search
 (4 charges, 100.0s action, 180.0s cooldown) or Defensive AA Fire
  (4 charges, 40.0s action, 180.0s cooldown)
 - Slot 4: Spotting Aircraft
 (4 charges, 100.0s action, 240.0s cooldown)
Gallery
WoWs Gallery

Historical Gallery
Categories:
