Ship:Sevastopol

 |
Purchase priceSpecial  |
| Hit Points62,600 |
| 380 mm/52 SK C/34 on a Drh LC/34 mount3 х 2 pcs. |
| Rate of Fire2.5 shots/min |
| Reload Time24 sec |
| Rotation Speed5 deg/sec |
| 180 Degree Turn Time36 sec |
| Firing Range19.1 km |
| Maximum Dispersion164 m |
| HE Shell380 mm HE Model 1939 |
| Maximum HE Damage5,350 |
| Chance of Fire34 % |
| Initial HE Velocity820 m/s |
| HE Shell Weight800 kg |
| AP Shell380 mm AP Model 1939 |
| Maximum AP Shell Damage11,300 |
| Initial AP Shell Velocity820 m/s |
| AP Shell Weight800 kg |
| Maximum Speed33.5 knot |
| Turning Circle Radius980 m |
| Rudder Shift Time15.1 sec |
| Surface Detectability Range13.6 km |
| Air Detectability Range10 km |

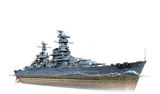
Sevastopol — Soviet special premium Tier X cruiser.
In May 1940, the Naval Academy hosted tactical games that involved the Project 69 cruiser and battleships Scharnhorst and Dunkerque. The event showed that the replacement of 305 mm guns with German 380 mm guns significantly increased the cruiser's firepower. Later, an agreement was signed with the German company Krupp, which was supposed to deliver six turrets before March 1943. The turrets were to be mounted on cruisers Kronshtadt and Sevastopol, which were planned to be launched in 1942, but the outbreak of war canceled these plans.
Sevastopol was first released for sale on 10 August 2022, and is available in the Research Bureau for 58,000 .
.
Modules
 | Rate of Fire (shots/min) | 180° Turn Time (sec) | Maximum Dispersion (m) | Maximum HE Shell Damage (HP) | Chances of HE shells causing a fire on target (%) | Maximum AP Shell Damage (HP) | Research price (exp) | Purchase price (  ) ) | |
|---|---|---|---|---|---|---|---|---|---|
| 380 mm/52 SK C/34 on a Drh LC/34 mount | 2.5 | 36 | 164 | 5,350 | 34 | 11,300 | 0 | 0 |
 | Hit Points (HP) | Armor (mm) | Armor (mm) | Main Turrets (pcs.) | Secondary Gun Turrets (pcs.) | AA Mounts (pcs.) | Torpedo Tubes (pcs.) | Hangar Capacity (pcs.) | Research price (exp) | Purchase price ( ) | |
|---|---|---|---|---|---|---|---|---|---|---|---|
| Sevastopol | 62,600 | 15 | 360 | 3 | 8 | 6/8 | 0 | 0 |
 | IDS_SHIP_PARAM_SUO_INCREASE_DIST (%) | Maximum Firing Range (km) | Research price (exp) | Purchase price ( ) | |
|---|---|---|---|---|---|
| GFCS X mod. 1 | 0 | 0 | 0 |
 | Maximum Speed (knot) | Research price (exp) | Purchase price ( ) | |
|---|---|---|---|---|
| Propulsion: 150,000 hp | 33.5 | 0 | 0 |
Compatible Upgrades
| Slot 1 |
 |
 |

| |
|---|---|---|---|---|
| Slot 2 |
 |
 |
 |

|
| Slot 3 |
 |
 |
 |

|
| Slot 4 |
 |
 |
 |

|
| Slot 5 |
 |
 |
 |

|
| Slot 6 |
 |
 |

|
Player Opinion
Performance
Refer to the in-game Port screens for more useful data.
Tier X cruiser Sevastopol shares many traits with both Tier IX German cruiser Siegfried and real-life sister ship Kronshtadt. Planned as the second Kronshtadt-class cruiser using 380mm Bismarck-class guns purchased from the Germans, she inherits many of Kronshtadt’s strengths and weaknesses. Her consumable suite sets her apart, and most notably she inherits Siegfried’s cruiser dispersion, giving her the most accurate large caliber guns in the game.
Armament
Like Kronshtadt and Siegfried at Tier IX, Sevastopol is primarily about her guns. She carries six 380mm guns in three twin turrets, the same as found on Siegfried and Tier VIII battleship Bismarck. Along with Siegfried, she has the largest main battery guns on any cruiser in the game, and maintains Siegfried’s cruiser dispersion trait rather than the battlecruiser dispersion on many other large cruisers. Combined with their 25mm AP overmatch, she is a major threat to any broadside target and many cruisers won’t be able to angle against her shells provided her aim is true.
Her main battery range is high for a cruiser, similar to Alexander Nevsky and Henri IV, and slightly shorter than Moskva. However, her 24 second main battery reload is the longest in her tier, only two seconds faster than Bismarck and Siegfried. As a result, she has the lowest main battery DPM of any Tier X cruiser. With her low barrel count, she will struggle against destroyers and sharply angled targets that she can’t overmatch. Her turret traverse is also slow at 36 seconds, the same as Stalingrad and her German counterparts, and only marginally faster than Petropavlovsk. She has slightly improved firing angles to both the front and rear, allowing her to get all guns on target while still bouncing almost all return fire off her main belt.
Both her HE and AP shells are similar to those found on Siegfried and Bismarck, although Sevastopol deals slightly more HE damage but slightly less AP damage. She also has less shell drag, so her shells fly faster than her German gun cousins. Both shell types have the highest damage of any Tier X cruiser, and her HE shells also feature an excellent fire chance. She has the same improved AP pen angles and slightly shorter fuse time as Petropavlovsk, reducing her chances of overpenetrating a target or bouncing off slightly angled armor. Thanks to her improved ballistics, she has more AP penetration than her German 380mm counterparts, although Stalingrad still penetrates more thanks to her increased shell velocity.
Sevastopol's entire secondary battery consists of 8 twin 100mm mounts. With no improved stats and standard range, they don’t even pose a threat to enemy destroyers.
Consumables
If her main battery wasn’t enough to set Sevastopol apart from other cruisers, her consumable suite is also unusual. In addition to the standard Hydroacoustic Search or Defensive AA Fire consumable option that most cruisers get, Sevastopol also has a unique Heavy Repair Teams, an Engine Boost, and the Fast Damage Control Team consumable rather than the normal Damage Control Party.
Sevastopol's Fast Damage Control Team  is similar to those found on the Russian battleships and German battlecruisers. The significantly faster cooldown leaves her less vulnerable to full duration fires or floods after repairing, but the limited charges can run out quickly if players don’t use them selectively. And unlike the battleships, Sevastopol only has three charges by default. With her 60 second duration fires and higher damage per second floods like other large cruisers, choosing which fires and floods to stop can be critical.
Sevastopol's Heavy Repair Teams  is her most unique consumable. It heals more penetration damage than any other Repair Party in the game, and shares the same 50% citadel damage heal as the British Specialized Repair Teams
  on Minotaur and Goliath. It also features a substantially longer active time, running more than two times longer at 60 seconds. However, it also has the longest cooldown time, more than a minute and a half longer than the standard consumable. When it’s active, Sevastopol can absorb and heal a substantial amount of damage, but while it’s on cooldown she can easily get focused down waiting for the next charge.
Her Engine Boost  consumable shares the same +20% boost to top speed as found on the French cruisers. Its cooldown time is faster at only 60 seconds, but the short 45 second action time limits its usefulness.
Maneuverability
Fitting her size, Sevastopol isn’t particularly agile. Both among large cruisers and cruisers in general at Tier X, her 33.5 knot top speed is average at best. With her Engine Boost consumable active, she can temporarily become one of the fastest cruisers in her tier at just over 40 knots, but its short duration limits her speed potential. Additionally, her rudder shift and turning circle are both among the worst in tier. Her turning circle is marginally better than those of Moskva and Stalingrad, comparable to Petropavlovsk’s, and her rudder shift is slower than all cruisers except Puerto Rico. Most notably, her rudder shift and turning circle are worse than Kronshtadt a tier lower, despite sharing a similar hull.
Unlike many other cruisers, Sevastopol can’t swing out to get guns on target and angle before the return fire arrives. Choosing the right angle to bounce shells before getting shot at is important. Her Engine Boost can help her get onto a flank quickly or run away from a strong push, but doesn’t provide the same dodging or relocation potential as on the French cruisers.
Survivability
Sevastopol has an impressive health pool for a Tier X cruiser, although it’s on the low end compared to other large cruisers. She also presents a large target, and her main battery threat will draw the attention of enemy ships. Her unique heal gives her a large potential health pool, but the long cooldown limits how much she’ll actually be able to heal back. Unlike Stalingrad and many other large cruisers, Sevastopol should avoid sustained fire whenever possible. Her respectable concealment compared to other large cruisers will help keep her alive, but among all Tier X cruisers or concealment is only average.
Like other large cruisers, fires burn for 60 seconds and floods deal twice as much damage per second. With her limited Fast Damage Control Team consumable, fires and floods pose a significant risk to her survival. As she lacks access to battleship survival skills like Fire Prevention and Basics of Survivability, signals and upgrades to reduce fire and flood damage are essential.
Although she carries battleship guns, her armor is still that of a cruiser. Her bow and stern are 25mm thick, and her deck and upper belt are only 30mm. She lacks the thicker deck and 50mm icebreaker plates found on other Russian heavy cruisers, so battleship AP and cruiser HE pose a much greater threat. She carries a thick main belt that extends well past her turrets, but her citadel also extends just as far. Unlike Moskva and Stalingrad, Sevastopol share’s Kronshtadt’s waterline citadel and spaced armor. Broadside hits will still result in citadel hits, but some shells can bounce or detonate early when sufficiently angled.
Anti-aircraft
Unlike the other Russian cruisers, Sevastopol's AA defenses are underwhelming. Most notably, she lacks the improved range typical of Tier X Russian cruisers, only reaching 5.8km on her long range mounts. Her mid range damage is slightly above average, but her long range defenses provide little protection, and she has no short range defenses. Her flak is also among the worst in her tier. She produces less flak than many other cruisers, and each explosion deals little damage.
Additionally, she has few AA mounts for her size. With only 14 mounts, losing more than a couple will noticeably reduce her defenses. Sustained HE fire will quickly destroy her mid range mounts, leaving her nearly defenseless against enemy planes.
Sevastopol can swap her Hydroacoustic Search for the Defensive AA Fire consumable to increase her continuous AA and flak damage, but it will still offer little improvement. And with her already lackluster AA defenses and poor agility, the extra warning for incoming torpedoes will often be more useful.
Battle performance
Like Siegfried, Sevastopol is a cruiser killer that wants to be on a flank. Her massive guns and improved AP penetration potential allow her to punish broadsides and force a crossfire, but her damage potential drops as soon as her targets start to angle if she can’t overmatch them. She lacks the utility and durability of her Russian heavy cruiser counterparts, limiting her usefulness outside of pure damage dealing. Her consumable suite is unique and allows some interesting gameplay when she can take advantage of it, but they don’t always synergize too well with her hull.
In most situations, Sevastopol relies on enemy ships cooperating to be effective. And when they don’t cooperate, there’s very little she can do for her team. She has the potential to choose her fights and contribute a lot to her team’s flank, but requires a thorough understanding of the game and sometimes a healthy amount of luck to reach her true potential.
Pros:
- Large health pool
- Thick main armor belt, with an upper belt capable of bouncing up to 429mm AP shells.
- Very large gun caliber for a cruiser
- Improved AP pen angles and less fuse time, similar to Petropavlovsk
- Cruiser dispersion.
- Very high AP penetration among cruisers, second only to Stalingrad.
- Good concealment for her size
- Uses the Fast Damage Control Team with a shorter cooldown
- Best survivability among cruisers thanks to the Heavy Repair Teams that heal 75% penetration and 50% citadel damage.
- Has access to an improved version of Engine Boost, which gives more speed than the standard one and recharges faster.
- Can mount DFAA
Cons:
- 60-second fire duration
- Large and vulnerable citadel
- Prone to receive heavy damage quickly when confronted by +430mm armed battleships.
- Slow main battery reload
- Worst AP and HE DPM among TX cruisers
- Slow turret traverse
- AA is not impressive, especially when compared to Petropavlovsk or Moskva.
- Slow rudder shift with a large turning circle radius
- Does not have access to the Surveillance Radar consumable
- Limited charges of her Fast Damage Control Team
- Very long Heavy Repair Teams cooldown
- Short Engine Boost duration
Research
Optimal Configuration
Upgrades
The recommended upgrades are:
- Slot 1: Main Armaments Modification 1

- Slot 2: Engine Room Protection
 or Hydroacoustic Search Modification 1
- Slot 3: Aiming Systems Modification 1

- Slot 4: Propulsion Modification 1
 or Damage Control System Modification 2
- Slot 5: Concealment System Modification 1

- Slot 6: Main Battery Modification 3

Commander Skills
Unique commander Nikolay Kuznetsov is a good fit for Sevastopol, thanks to his Emergency Reserve and Will for Victory talents.
Recommended Commander Skills 
| ||||||
|---|---|---|---|---|---|---|
| Cost (points) |
Attack | Defense | ||||
1 |
 ★★★ |

|

|
 ★★ |
 ★ |

|
2 |
 ★ |

|
 ★★ |

|
 ★★★ |

|
3 |

|

|
 ★★★ |
 ★★ |
 ★★★ |
 ★ |
4 |
 ★★ |

|

|

|
 ★★★ |

|
| Key: ★★★ - Extremely Useful ★★ - Frequently Useful ★ - Occasionally Useful No stars - Not Useful | ||||||


Consumables
Sevastopol equips the following consumables:
- Slot 1: Fast Damage Control Team – 3 charges
- Slot 2: Defensive AA Fire
 – 4 charges or Hydroacoustic Search
  – 3 charges
 - Slot 3: Heavy Repair Teams – 3 charges
- Slot 4: Engine Boost – 4 charges
Camouflage
As a premium ship, Sevastopol comes with Default permanent camouflage and a set of permanent combat bonuses.
Signals
Recommended Signal Flags 
| |||||
|---|---|---|---|---|---|
| Combat | |||||

|
 ★★ |
 ★★★ |
 ★ |

|

|

|

|

|
 ★★★ |
 ★★★ |
 ★★★ |

|
 ★ | ||||

Gallery
Historical Info
Historical Gallery
References
