Ship:Split

 |
 |
 |
|
 |
| Research price110000 exp |
Purchase price9,000,000  |
| Hit Points13,400 |
| 140 mm/56 Škoda on a shielded mount5 х 1 pcs. |
| Rate of Fire17.6 shots/min |
| Reload Time3 sec |
| Rotation Speed10 deg/sec |
| 180 Degree Turn Time18 sec |
| Firing Range10.3 km |
| Maximum Dispersion92 m |
| HE Shell140 mm HE |
| Maximum HE Damage2,000 |
| Chance of Fire10 % |
| Initial HE Velocity840 m/s |
| HE Shell Weight39.9 kg |
| 533 mm TR Mk IV2 х 3 pcs. |
| Rate of Fire1 shots/min |
| Reload Time60 sec |
| Rotation Speed deg/sec |
| 180 Degree Turn Time7.2 sec |
| TorpedoTorped M1943 mod 0 |
| Maximum Damage10,700 |
| Torpedo Speed76 knot |
| Torpedo Range8.5 km |
| Maximum Speed38 knot |
| Turning Circle Radius640 m |
| Rudder Shift Time5.5 sec |
| Surface Detectability Range8.5 km |
| Air Detectability Range3.8 km |

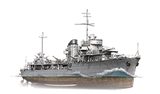
Split — European Tier VIII destroyer.
In the 1930s, by order of the Yugoslav Navy, French specialists designed a large destroyer based on Le Fantasque. The boiler-and-turbine plant and gun fire-control system were purchased in the U.K. and France, respectively. Split, a ship named after the city where she was built, was laid down in 1939 and was to be armed with five Czechoslovak-produced 140 mm guns. In 1941, the city of Split was captured by the Italians, who decided to complete the construction of the ship. In 1943, the destroyer was renamed Spalato and launched. After the capitulation of Italy, the ship was grounded in the port. In 1948, Yugoslavia resumed work on the ship, but receiving weapons from Czechoslovakia was no longer possible, and Split was eventually completed with British-American weapons instead. The ship entered service in 1958, immediately becoming the navy's flagship.
Split was first available via early access on 24 May 2023, and later became researchable on 19 July 2023.
Modules
 | Rate of Fire (shots/min) | 180° Turn Time (sec) | Maximum Dispersion (m) | Maximum HE Shell Damage (HP) | Chances of HE shells causing a fire on target (%) | Maximum AP Shell Damage (HP) | Research price (exp) | Purchase price ( ) | |
|---|---|---|---|---|---|---|---|---|---|
| 140 mm/56 Škoda on a shielded mount | 17.6 | 18 | 92 | 2,000 | 10 | 0 | 900,000 |
 | Hit Points (HP) | Armor (mm) | Armor (mm) | Main Turrets (pcs.) | Secondary Gun Turrets (pcs.) | AA Mounts (pcs.) | Torpedo Tubes (pcs.) | Hangar Capacity (pcs.) | Research price (exp) | Purchase price ( ) | |
|---|---|---|---|---|---|---|---|---|---|---|---|
| Split (A) | 13,400 | 13 | 20 | 5 | 6/8 | 2 | 0 | 1,350,000 | |||
| Split (B) | 16,600 | 13 | 20 | 5 | 6/8 | 2 | 33,000 | 2,100,000 |
 | Rate of Fire (shots/min) | Torpedo Tubes Reload Time (sec) | 180° Turn Time (sec) | Maximum Damage (HP) | Torpedo Speed (knot) | Torpedo Range (km) | Research price (exp) | Purchase price ( ) | |
|---|---|---|---|---|---|---|---|---|---|
| 533 mm Mk | 1 | 60 | 7.2 | 10,700 | 76 | 8.5 | 0 | 900,000 |
 | IDS_SHIP_PARAM_SUO_INCREASE_DIST (%) | Maximum Firing Range (km) | Research price (exp) | Purchase price ( ) | |
|---|---|---|---|---|---|
| SUO Mk 8 Mod. 1 | 0 | 0 | 900,000 | ||
| SUO Mk 8 Mod. 2 | 0 | 22,000 | 1,400,000 |
 | Maximum Speed (knot) | Research price (exp) | Purchase price ( ) | |
|---|---|---|---|---|
| Propulsion: 55,000 hp | 38 | 0 | 900,000 |
Compatible Upgrades
| Slot 1 |
 |
 |

| ||
|---|---|---|---|---|---|
| Slot 2 |
 |
 |
 |

| |
| Slot 3 |
 |
 |
 |
 |

|
| Slot 4 |
 |
 |
 |

| |
| Slot 5 |
 |
 |
 |

|
Player Opinion
Performance
Refer to the in-game Port screens for more useful data.
Split is the Tier VIII tech tree ship for the second European destroyer line. She carries larger caliber guns than her predecessors, and gains access to the Surveillance Radar  consumable.
Main Battery
Split's main battery consists of five quick-firing 140 mm guns in single turrets. Her HE shells deal respectable damage, and have a high fire chance. Their comfortable ballistics make them easy to use, and due to their high rate of fire and damage, they pose a threat to most enemy destroyers. However, despite the larger caliber, the penetration is too low to damage cruiser and battleship plating. Her range leaves something to be desired, and she has no access to AP or SAP.
Most enemy destroyers should be wary of Split's firepower. Although she is not among the best gunboats, she is still very capable of self-defense. However, captains should not be too aggressive; she cannot sustain prolonged firefights without smoke or solid cover, and her turret traverse is too slow to respond to immediate threats. Her guns should be used for opportunistic attacks against enemies with low health or from a position of safety.
Torpedoes
When her guns cannot be used, Split also has a moderate torpedo armament. Her six underwhelming torpedoes pale in comparison to other Tier VIII destroyers, but they have the range to be launched from stealth and have high speed and quick reload. Due to the low damage and quantity of torpedoes, care should be taken before committing to a close-range attack; many full-health opponents will survive a full torpedo salvo, leaving Split in an undesirably vulnerable position.
The torpedoes can be utilized to cause floods, which may prompt enemies to use their Damage Control Party, leaving them vulnerable to fires. They can also be useful while kiting, although they have narrow and awkward firing angles.
Other Armament
Split's ASW is relatively average, and she is neither a small nor a particularly stealthy destroyer. These factors, plus her relatively low depth charge damage, mean that loitering long enough to destroy a submarine with depth charges can make her an easy target. Do not rush at a healthy submarine expecting to score a quick kill.
On paper, Split's AA is decent, but in reality it does little to deter aerial attacks. It has enough damage to quickly shoot down fighters and may score some kills while under attack, but it cannot prevent damage from determined aerial attackers.
Survivability
Split has moderate HP, good speed and poor concealment. But she is a reasonably large destroyer with no notable armor, making it easy for enemies to hit and damage her with no way to repair any damage.
Split is fast and somewhat agile for her size, but her acceleration is poor. Her generous gun angles can help her fire while kiting if she must fight in the open, but this should be avoided; her ability to fight effectively relies on properly using her consumables.
Consumables
Split is equipped with the standard Damage Control Party consumable, and additionally has a Smoke Generator  , an Engine Boost
  with a short cooldown and a Surveillance Radar with good range and fast reload but very short duration.
The smoke generator is an invaluable tool for concealing her presence while firing, making it harder for enemies to return fire. The radar's short duration and fast cooldown mean it is better suited to regularly checking her surroundings rather than keeping an enemy spotted long enough to destroy it.
When used together, Split can reverse a situation of being out-spotted by concealing herself with smoke and revealing the enemy with radar. Although the radar only lasts a moment, any enemy destroyer close enough to detect Split is within radar range.
Performance
Playing Split to her full potential can be challenging. Using her guns and torpedoes almost always means putting herself in risky situations. She can be a cumbersome destroyer that struggles when caught unaware by her opponents. All her weapons have workable range, but captains must be aware of any long-range enemy radar which is increasingly common at her tier. Without AP shells, she also lacks the potential bursts of damage AP can cause. Captains should always bear in mind that they are limited to the HE shells and their low penetration before opening fire.
Managing interactions with enemy destroyers and submarines can be key to success with Split, as they will generally spot her before she spots them. While it is tempting to radar in response and counterattack, Split rarely profits from such aggressive moves and cannot recover from mistakes easily. Her radar can provide her with intel, meanwhile, she can attack from a distance using smoke and torpedoes until more favorable circumstances arise.
In the opening minutes of a battle, Split can concentrate on spotting, confident that she can detect anything that might out-spot her while still avoiding reckless combat. Chip away at enemies with fires and floods, and use her speed and armament to attack more isolated enemies as the battle progresses.
Pros:
- High rate of fire
- High fire chance
- Good ballistics
- Quick-reloading, fast-moving torpedoes which can be fired from stealth
- Access to Smoke Generator
- Fast, with access to Engine Boost with reduced reload time
- Access to Surveillance Radar with good range and fast reload
Cons:
- Only moderate hitpoints with no Repair Party

- Large target
- Only has HE shells
- Low HE penetration
- Slow turret traverse with short main battery range
- Low torpedo damage, with short torpedo range
- Weak AA defenses
- Extremely short Surveillance Radar duration
Research
Researchable upgrades for Split:
- Hull: Upgrade to Hull (B) for improved survivability, maneuverability and AA. Research of this module unlocks progression to Lambros Katsonis.
- Gun Fire Control System: Upgrade to SUO Mk 8 Mod. 2 for an extra 10% range on the main battery.
Optimal Configuration
Upgrades
The recommended upgrades are:
- Slot 1: Main Armaments Modification 1

- Slot 2: Engine Room Protection

- Slot 3: Aiming Systems Modification 1
 or Torpedo Tubes Modification 2
- Slot 4: Propulsion Modification 1

- Slot 5: Concealment System Modification 1

The choice between Aiming Systems Modification 1 or Torpedo Tubes Modification 2 comes down to whether a captain would rather have 7% improved main battery dispersion or 5% faster moving torpedoes. Both of these stats are already quite good on Split, making both a viable option. A more passive captain might prefer to optimize her torpedoes with speed and survivability, whereas captains who prefer to pick fights with enemy DDs would benefit from the improved gun dispersion.
Commander Skills
Recommended Commander Skills 
| ||||||
|---|---|---|---|---|---|---|
| Cost (points) |
Attack | Defense | ||||
1 |
 ★★ |
 ★ |

|

|
 ★ |
 ★★★ |
2 |
 ★★ |
 ★ |

|

|
 ★★ |
 ★★★ |
3 |
 ★★ |

|
 ★★★ |
 ★ |
 ★★ |
 ★★★ |
4 |
 ★★★ |

|
 ★ |
 ★ |
 ★★★ |

|
| Key: ★★★ - Extremely Useful ★★ - Frequently Useful ★ - Occasionally Useful No stars - Not Useful | ||||||

Consumables
Split equips the following consumables:
- Slot 1: Damage Control Party

- Slot 2: Smoke Generator – 3 charges
- Slot 3: Engine Boost – 4 charges - Faster consumable reload than average
- Slot 3: Surveillance Radar – 4 charges - Long range, fast reload, short duration
Signals
Recommended Signal Flags 
| |||||
|---|---|---|---|---|---|
| Combat | |||||

|

|

|

|
 ★★★ |
 ★★★ |

|

|

|
 ★★★ |
 ★★ |

|
 ★ |

| ||||

Gallery
Historical Info
Historical Gallery
References
Ship Change Log
| Destroyers | II Tátra • III Romulus • IV Klas Horn • V Visby • V Muavenet • V Kalmar  • VI Västerås • VI Stord • VII Skåne • VII Grom • VII Błyskawica • VII Stord '43 • VII Scarlet Storm • VIII Öland • VIII Split • VIII Orkan • VIII Błyskawica '44 • IX Östergötland • IX Lambros Katsonis • IX Velos • IX Friesland • IX Jäger • IX Błyskawica '52 • X Halland • X Gdańsk • X Småland • X Ragnar • ★ Dalarna • VI Västerås • VI Stord • VII Skåne • VII Grom • VII Błyskawica • VII Stord '43 • VII Scarlet Storm • VIII Öland • VIII Split • VIII Orkan • VIII Błyskawica '44 • IX Östergötland • IX Lambros Katsonis • IX Velos • IX Friesland • IX Jäger • IX Błyskawica '52 • X Halland • X Gdańsk • X Småland • X Ragnar • ★ Dalarna
|
| Cruisers | I Gryf • VI Elli • VIII Regele Carol I • X Svea
|
| Battleships | IV Yavuz Sultan Selim • V Tegetthoff • V Viribus Unitis • VI Laudon • VII Chios • VII Lugdunum • VIII Enigheten • VIII Turgut Reis • IX Gustav den Store • IX Karl XIV Johan • IX Niord • IX Karl XIV Johan B • X Thor
|
